Let’s continue with our lab upgrade project. So far, we’ve assembled the hardware and hopefully come up with a good enough architectural network design to get us started. Our next step will be to deploy the core infrastructure which will be made up of the hypervisor, firewall and router.
For those new to the term, a hypervisor is a software that allows us to create and manage multiple operating systems (or multiple instances of the same operating system) on a single system. In short, we only have 1 computer (called the host) but we would like it to act as if we have more than X computers (called virtual machines). There are two types of hypervisors, type 1 runs directly onto of the physical hardware and type 2 which does not run directly on the hardware (bare-metal). Instead, it is run as an application onto of another OS. What the hypervisor does is that it manages access how the virtual machines access the computer’s processor, memory, and other resources. If you are new to virtualisation, you can read this easily digestible article from redhat here. In our case, we will run the hypervisor directly on the physical system. The hypervisor we will use is Proxmox mainly because it is open-source, free and does not have unnecessary limitations.
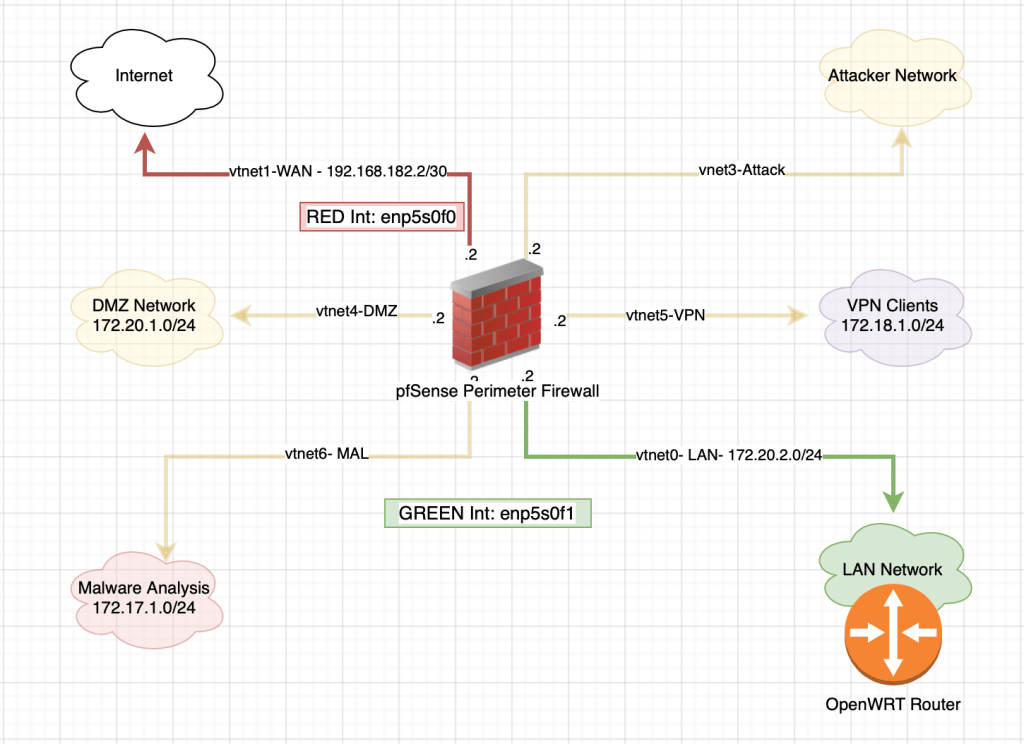
For Network Security and partial segmentation, we use the open-source pfSense firewall to segment the networks. For a minimal setup, the Networks we are interested in for this section is the WAN that leads to the internet and the LAN that leads to the internal networks ( router). We will get the rest working once we have internal hosts we can use to connect to the Firewall.
Finally, to extend the networks and segment the internal LAN we use OpenWRT which is an open-source router. The router is just an unnecessary evil. You can definitely do without it but since I love playing with networking, I thought it best to throw it in :).
Table of Contents
Assumptions
The following assumptions have been made:
- You have a USB stick to load the proxmox image into
- At least 3 NICs available on the PC. I had to buy another Interface card with 2 interfaces as I only had 1 on the PC. Note: 2 NICs is also doable but I used 3.
Deploying Proxmox
We’ll first start with setting up our hypervisor – Proxmox.
Preparing a bootable USB stick
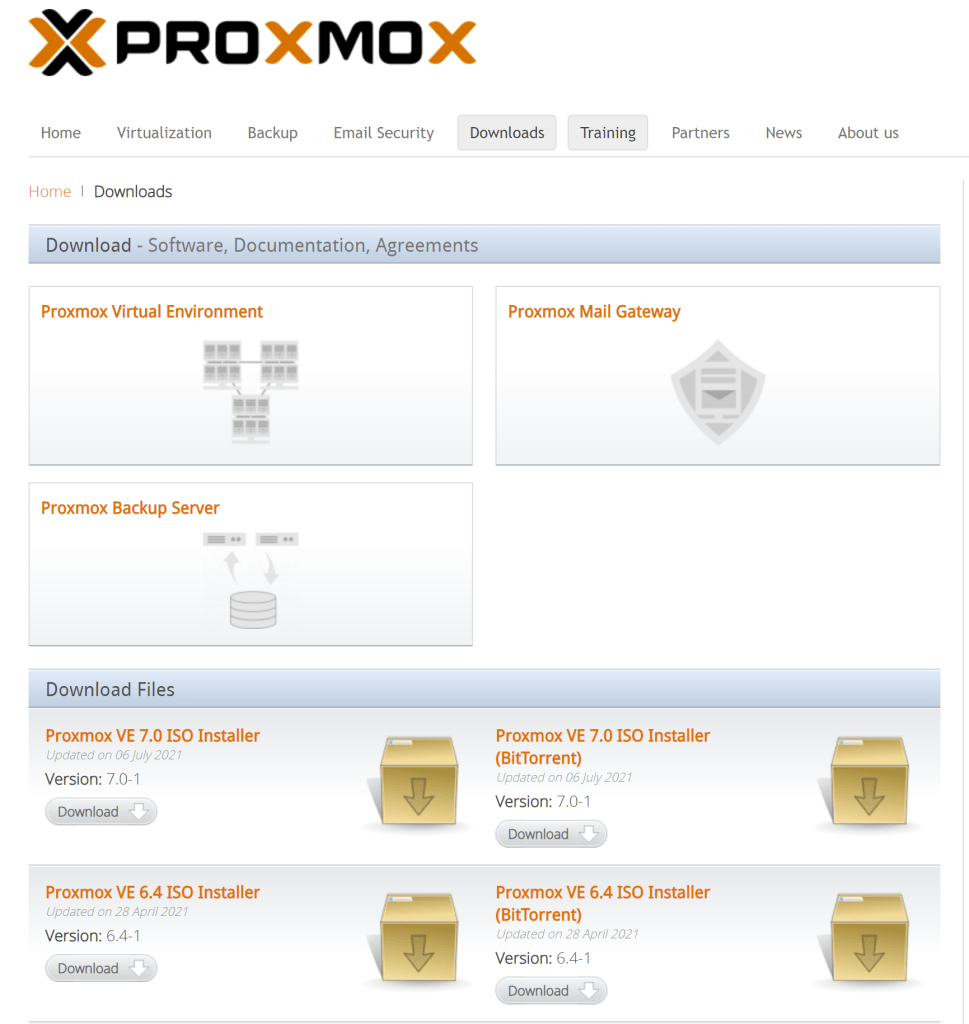
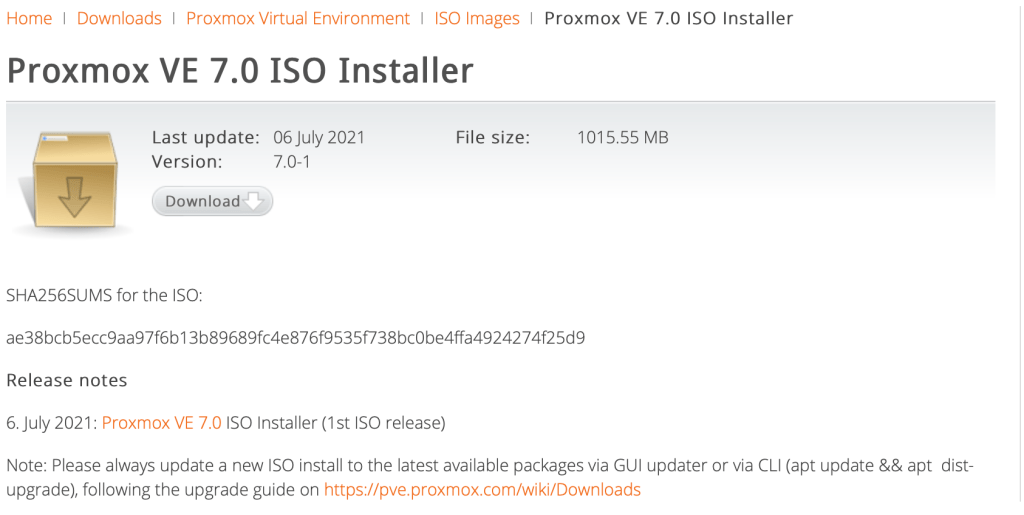
To get started, we need to download the installation ISO from the official website. We’ll go with Proxmox VE 7.0 ISO Installer which is the latest version.
Let’s validate the checksum
$ shasum -a 256 proxmox-ve_7.0-1.iso
ae38bcb5ecc9aa97f6b13b89689fc4e876f9535f738bc0be4ffa4924274f25d9  proxmox-ve_7.0-1.iso
The value matches with what is documented so we are good to go.
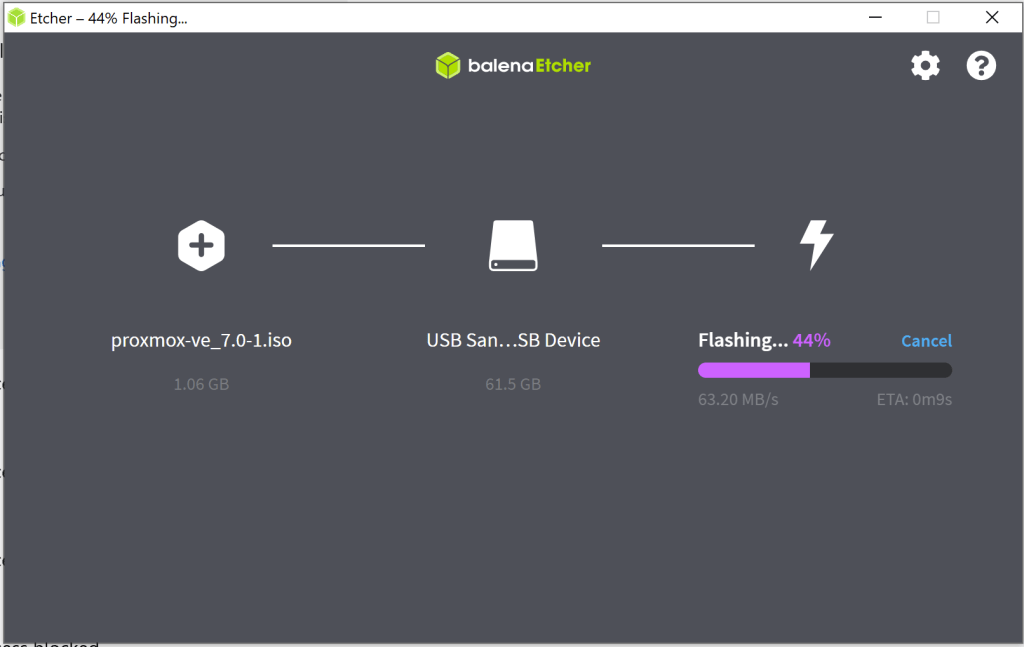
Preparing the bootable USB stick is straight forward. We need to load the iso file onto a USB flash drive in order to use it. We will use etcher to prepare the USB. Our first step is to select the installation file that we need to copy to the USB flash drive.
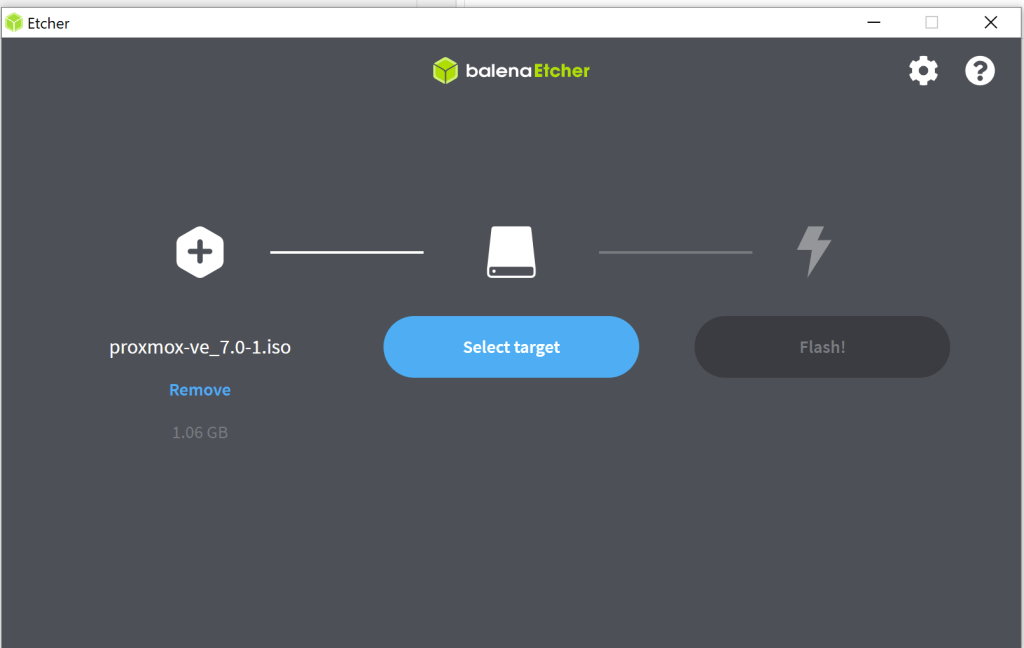
Next, we select the target. In this case, it’s the USB flash drive.

Finally, we can start copying the file to the USB.
We are now ready to install Proxmox.
Installing Proxmox
Once the USB stick is connected to the PC, we need to change the system boot order so that the computer can boot from our USB. In my case, it was as simple as pressing F12 while the system was powering on. We are then presented with the Welcome page for Proxmox.
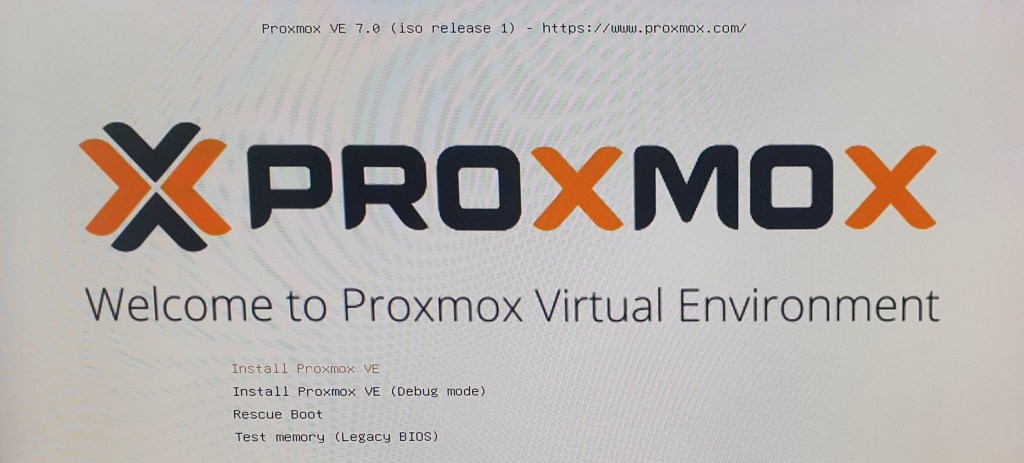
To Install Proxmox VE, simply follow the installation wizard.
- Click enter on “Install Proxmox VE”
- Accept the End User License Agreement (EULA)
- Select the Target Harddisk from the dropdown options provided. In our case, we will install Proxmox on a separate disk from the VMs.
- Specify your location, Timezone and keyboard layout options
- Specify an admin password and a valid email address
- Specify the management interface and network configuration parameters (FQDN, IP, Gateway and DNS Server)
- Confirm that the summary provided is correct and click install.
The installation process takes a couple of minutes and once done, a URL [https://YourIP:8006] to login to the server via webUI is provided. We can now connect to the server remotely.
Configuring Proxmox
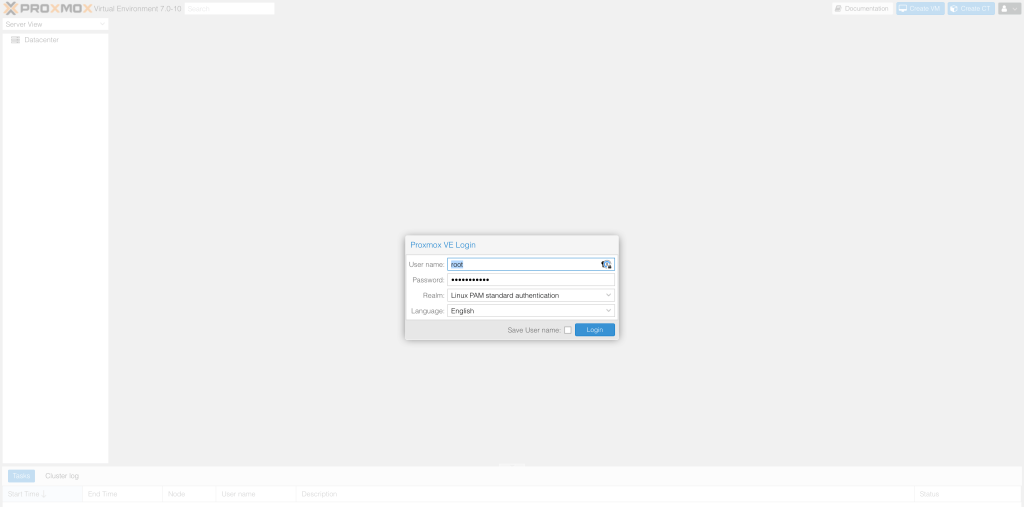
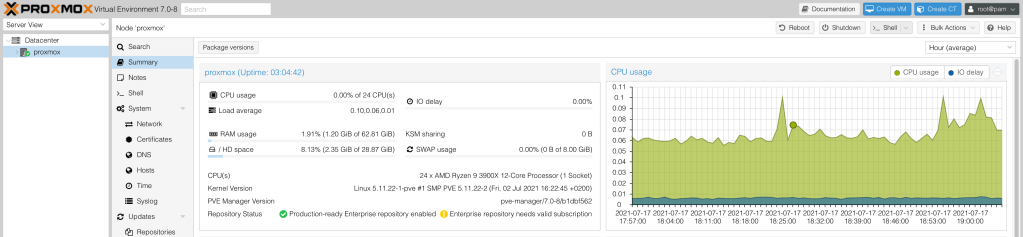
We can now access the GUI on another computer in the same network by navigating to [https://YourIP:8006]. We can login using the default username root and the password that we entered during installation.
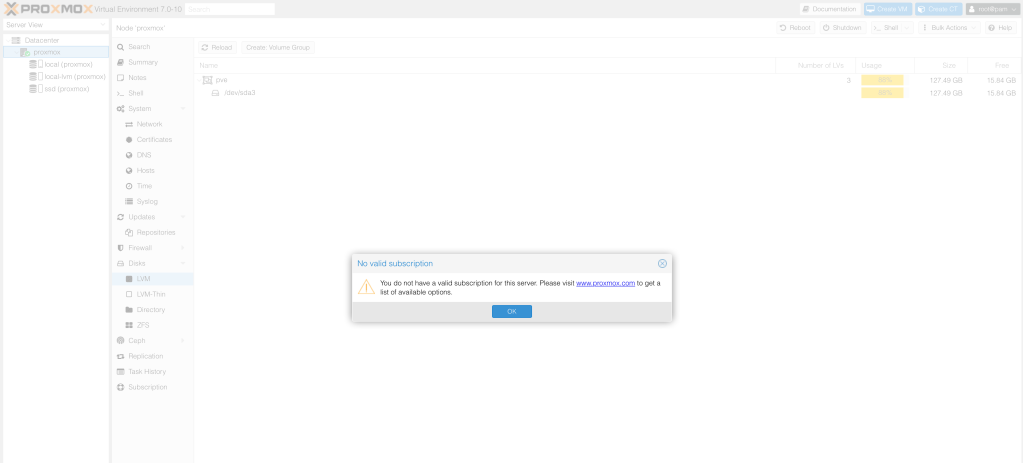
We are presented with a notice about the subscription. We can ignore this as we plan on using the community edition and not enterprise version.
Let’s drop to the “shell” to perform some initial tasks. We can do that by clicking on shell in the top right hand corner.
Software Updates
The first thing we will do is update the source lists to point to the correct repositories used for community edition. The uptown date package repo details are in the official wiki here.
root@proxmox:~# vi /etc/apt/sources.list
deb http://ftp.debian.org/debian bullseye main contrib
deb http://ftp.debian.org/debian bullseye-updates main contrib

# PVE pve-no-subscription repository provided by proxmox.com,
# NOT recommended for production use
deb http://download.proxmox.com/debian/pve bullseye pve-no-subscription

# security updates
deb http://security.debian.org/debian-security bullseye-security main contrib
Since we are not using the Proxmox VE Enterprise Repository, we need to remove or disable it. This prevents error messages since we do not have a subscription key.
root@proxmox:~# cd /etc/apt/sources.list.d/
root@proxmox:/etc/apt/sources.list.d# ls
pve-enterprise.list
root@proxmox:/etc/apt/sources.list.d# mv pve-enterprise.list pve-enterprise.list.disabled
We are now ready to update the package list and install all available software updates.
root@proxmox:/etc/apt/sources.list.d# apt update
root@proxmox:/etc/apt/sources.list.d# apt dist-upgrade -y
Storage Setup
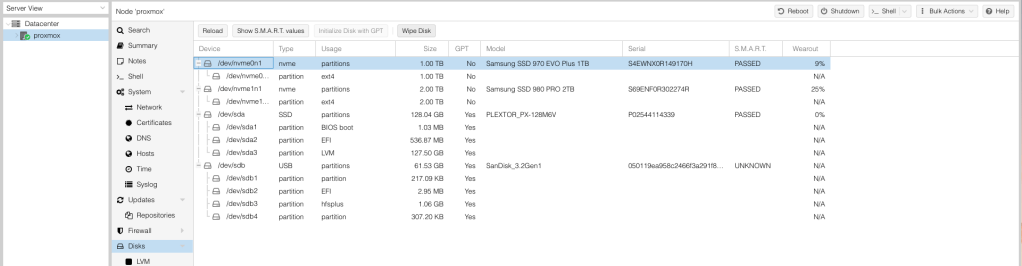
We will use a separate SSD from the one we installed Proxmox on for the VMs and ISOs. Ideally, we’d separate ISO and VMs but since we only have one remaining SSD, it will have to do for now. We need to first format the disk by selecting the appropriate SSD disk then selecting “Wipe disk”.
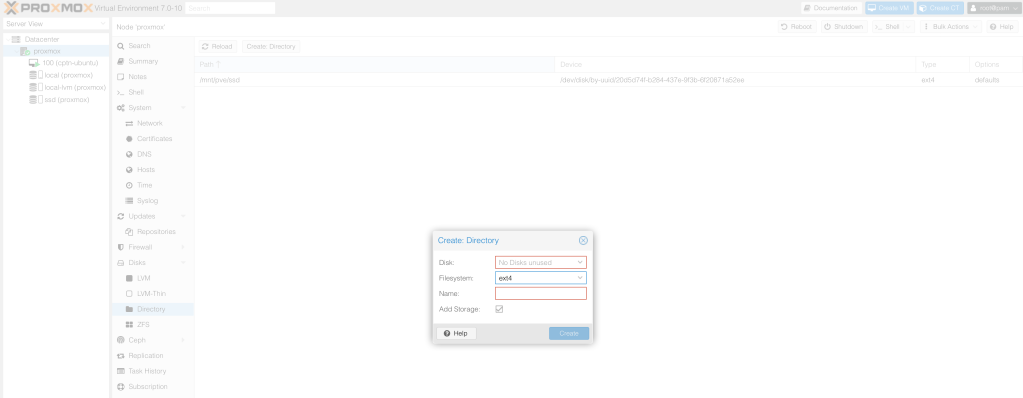
We can now create a directory that will house the ISO and the VMs. Navigate to the “Directory” menu and click “create Directory”. We need to select the disk from the available drop down. We will select the disk that we just formatted. Select the ext4 file system. Give the directory a name and click create.
Once the directory is created, we can now see the storage entry appear in the main Proxmox menu as ssd and are ready to upload ISO files to the disk. Let’s upload ISO images to this drive by clicking on the storage entry with the name we just created, then going to “ISO Images”, and then pressing “Upload”.
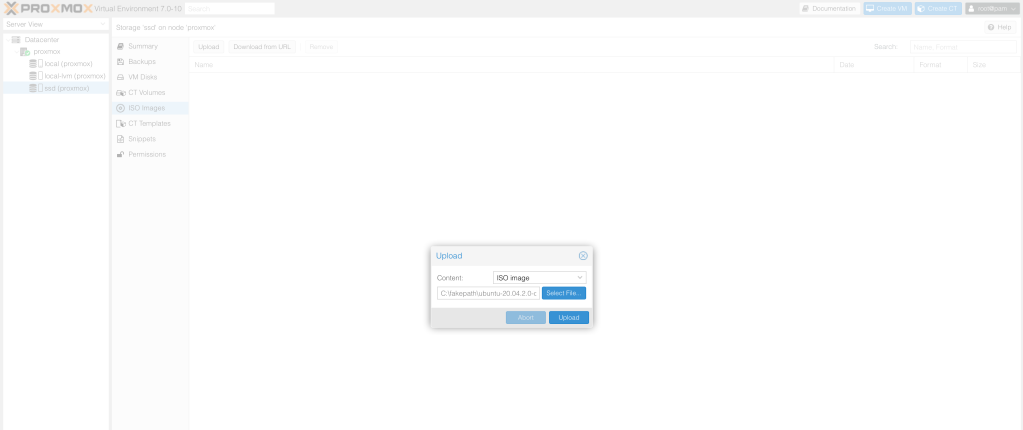
The uploaded ISO appears in the repo and can now be used to create VMs.

Setting up Networking
We will set up the networks as per the architectural design outlined here.
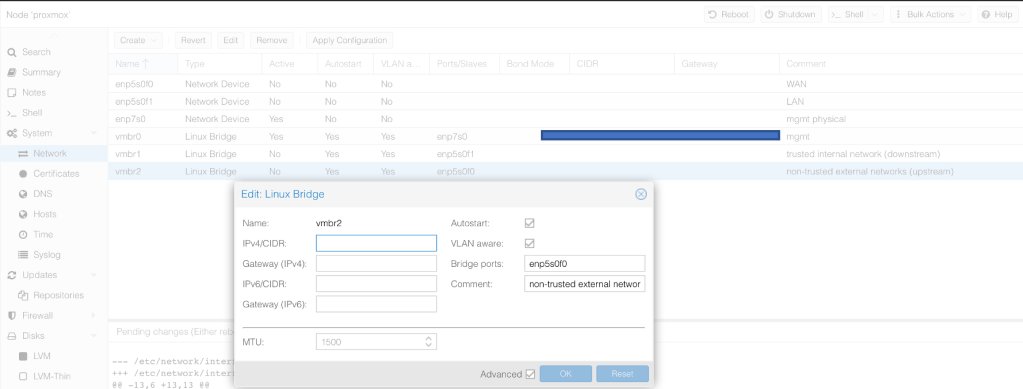
We currently have 3 physical NICs (enp*). We will use the default Linux bridge for networking. We will use
- vmbr0 as the Proxmox management interface
- vmbr1 as the upstream interface housing non-trusted external networks (Attacker Network, DMZ, VPN Clients & Malware Analysis subnets)
- vmbr2 as the downstream interface housing my trusted internal networks ( Server, NetSec Mgmt, User and Playground)
Let’s install ifupdown2 utility that will help us make changes on the interface without having to reboot the server.
root@proxmox:~# apt install ifupdown2Setup the Upstream Interface by clicking on Create > Linux Bridge. We map this bridge to the physical interface enp5s0f1 used for connectivity to networks that are not trusted. Let’s call it WAN.

Next, create a similar interface to house the networks that are internal to the lab and we trust. Let’s call this the LAN.
Now that we are all set, we need to apply the configurations.

The status of the ports should change to Active. If that is not the case, there is something amiss.

Miscellaneous
There are a couple of other things we can do
- Modify the DNS server configuration under Proxmox > Systems to point to our preferred DNS servers
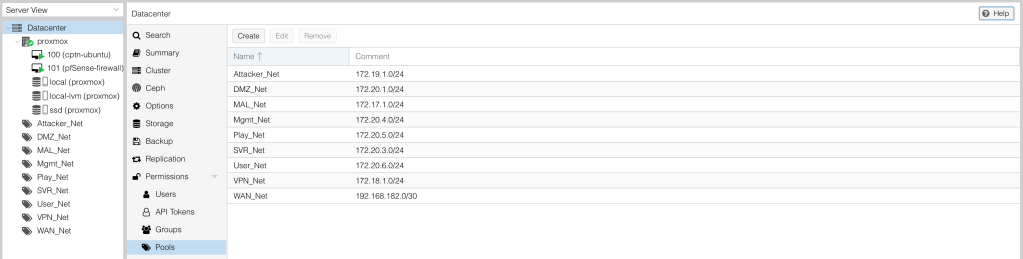
2. To keep our devices organised, we will create pools based on our predefined subnets.
Deploying pfSense
Our second core component to deploy is the Firewall which will be used to segment our network. We will use open-source pfSense. We can download the latest pfSense Community version from the official website. We specify the Architecture type to AMD64 and obtain the ISO installer from the nearest mirror.

Let’s validate the file’s integrity by calculating it’s checksum. This is to ensure that we have the correct file.
$ shasum -a 256 pfSense-CE-2.5.2-RELEASE-amd64.iso.gz
0266a16aa070cbea073fd4189a5a376d89c2d3e1dacc172c31f7e4e75b1db6bd  pfSense-CE-2.5.2-RELEASE-amd64.iso.gz
We can now extract the file using gzip to get the ISO pfSense-CE-2.5.2-RELEASE-amd64.iso.
$ gzip -d pfSense-CE-2.5.2-RELEASE-amd64.iso.gz
$ shasum -a 256 pfSense-CE-2.5.2-RELEASE-amd64.iso
234bcd61549867cfda719424a11bb0e13233c2b582acc7cec0ee1b0ec0966cf3  pfSense-CE-2.5.2-RELEASE-amd64.iso
Upload the ISO file to Proxmox via the GUI. We need to select the storage that we need and upload to ISO Images as seen below.
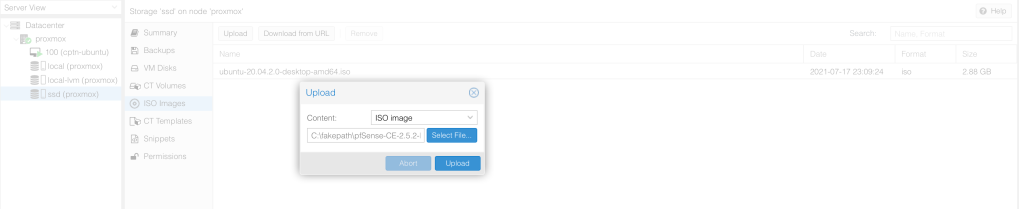
Once uploaded, the image appears in the list with the correct file size. We are ready to start installing pfSense.

Creating a VM for pfSense
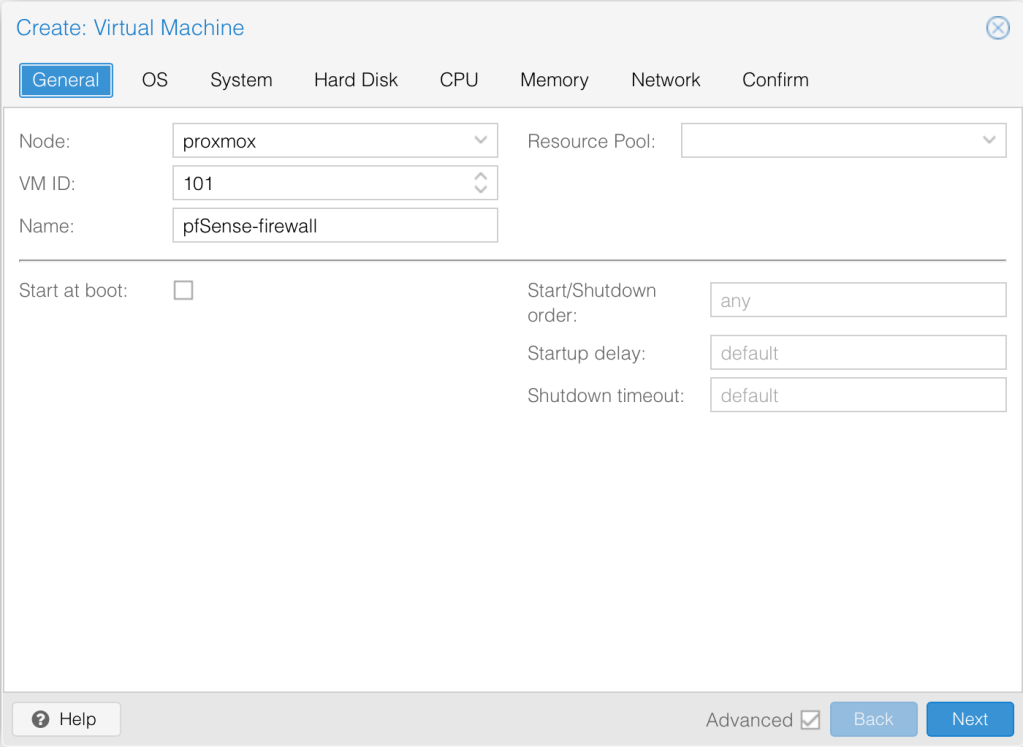
Let’s create a new virtual machine for pfSense. We can access that option from the very top right hand corner > Create virtual machine.

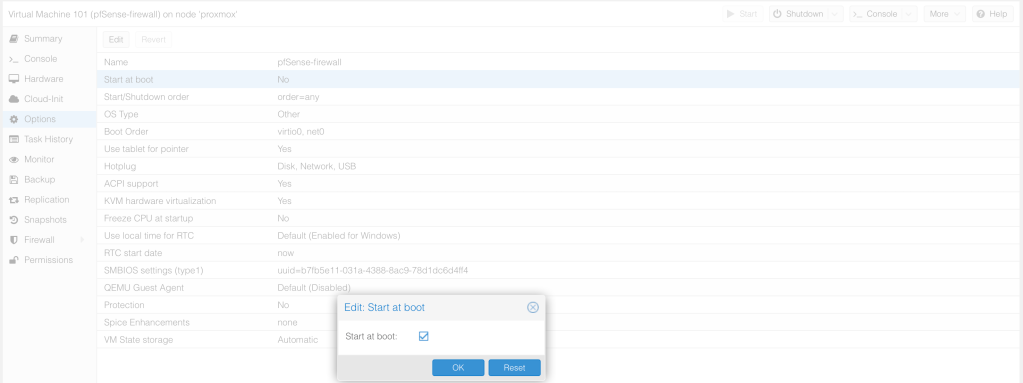
Name the VM pfsense-firewall. Select to start at boot.
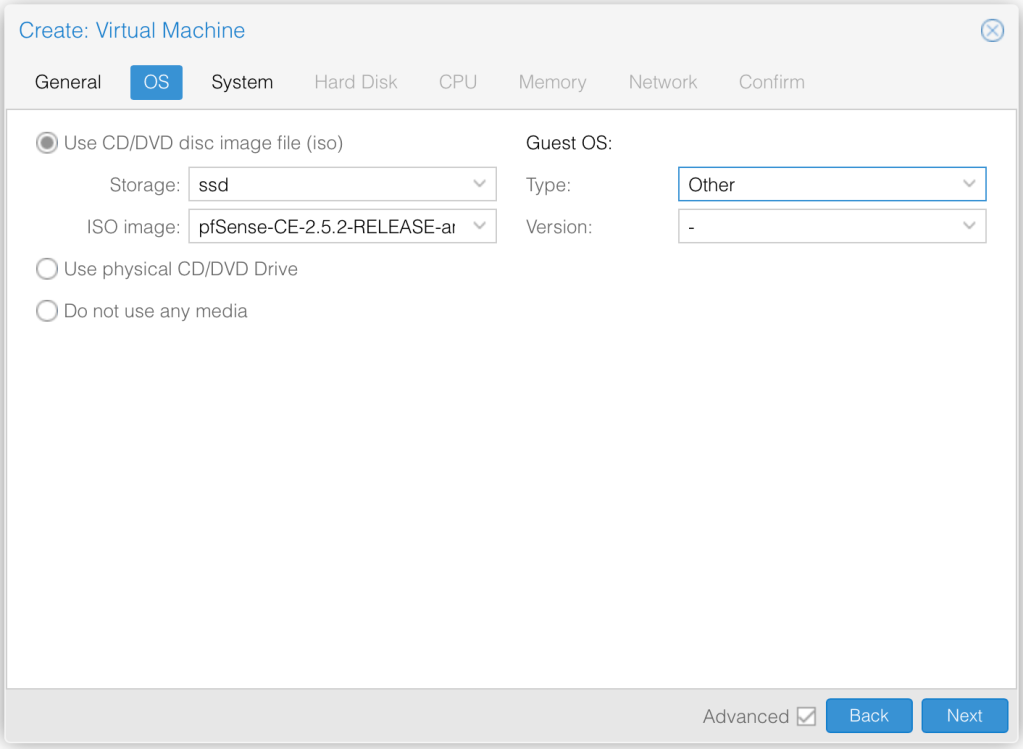
Next, let’s specify OS details by pointing the file that we just uploaded. The Guest OS is other.
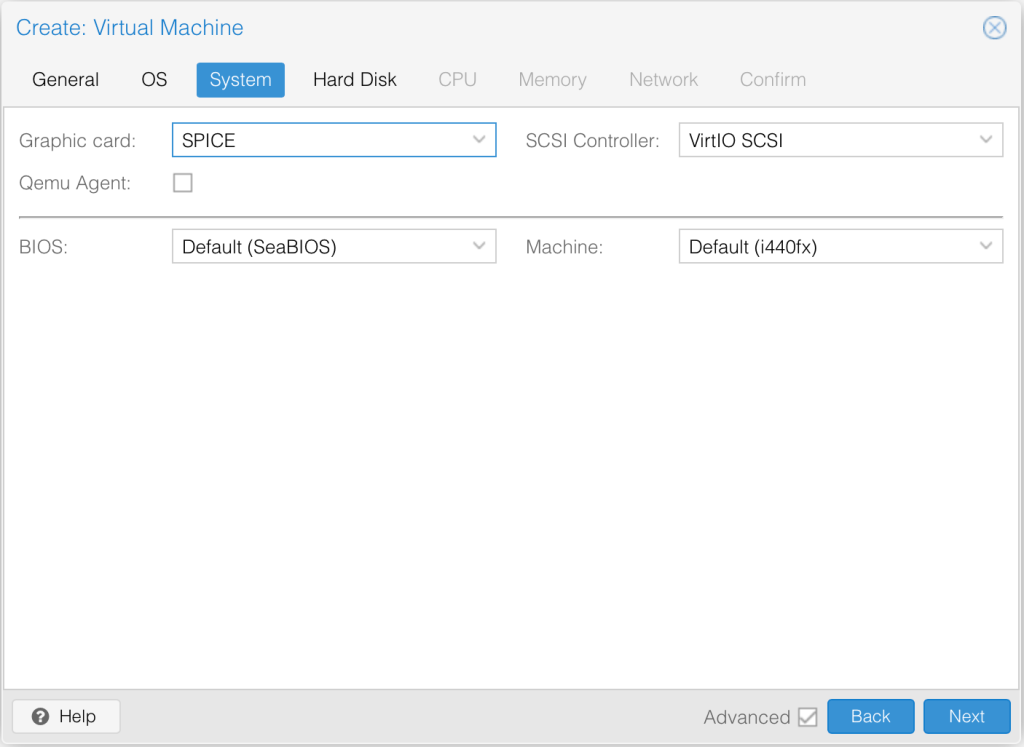
Next, we specify in SPICE graphics card in the system tab because the SPICE console uses less CPU when idle and supports more advanced console features than the default console.
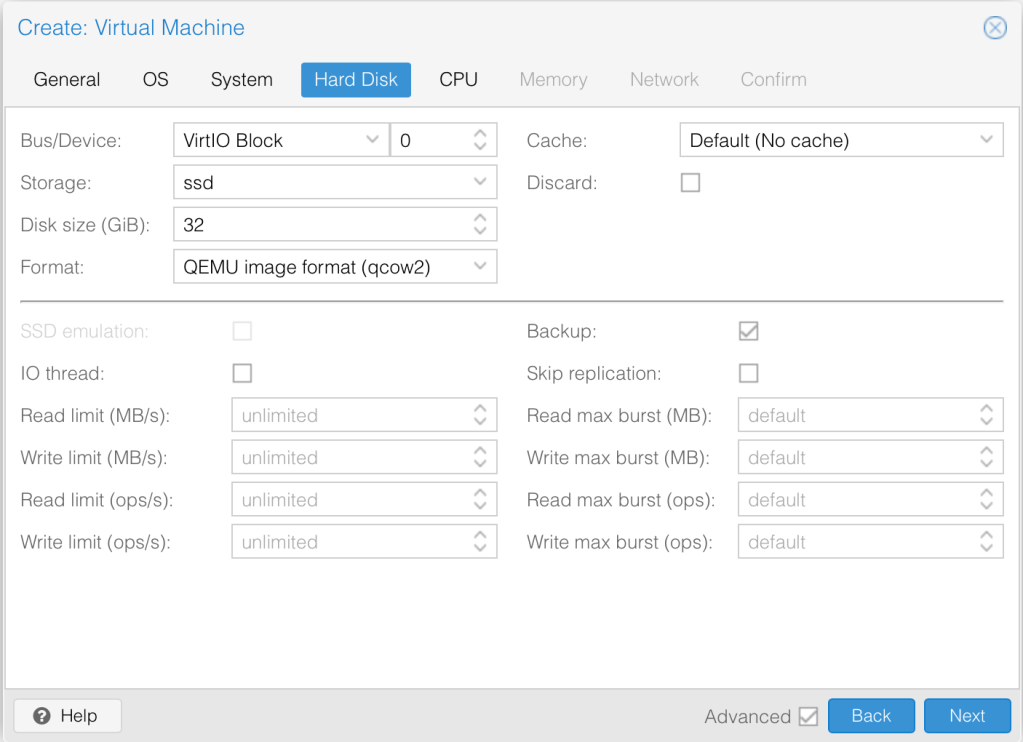
For Hardisk, we specify virtIO and select the Storage we want to use for it. We will leave the default disk size of 32GB.
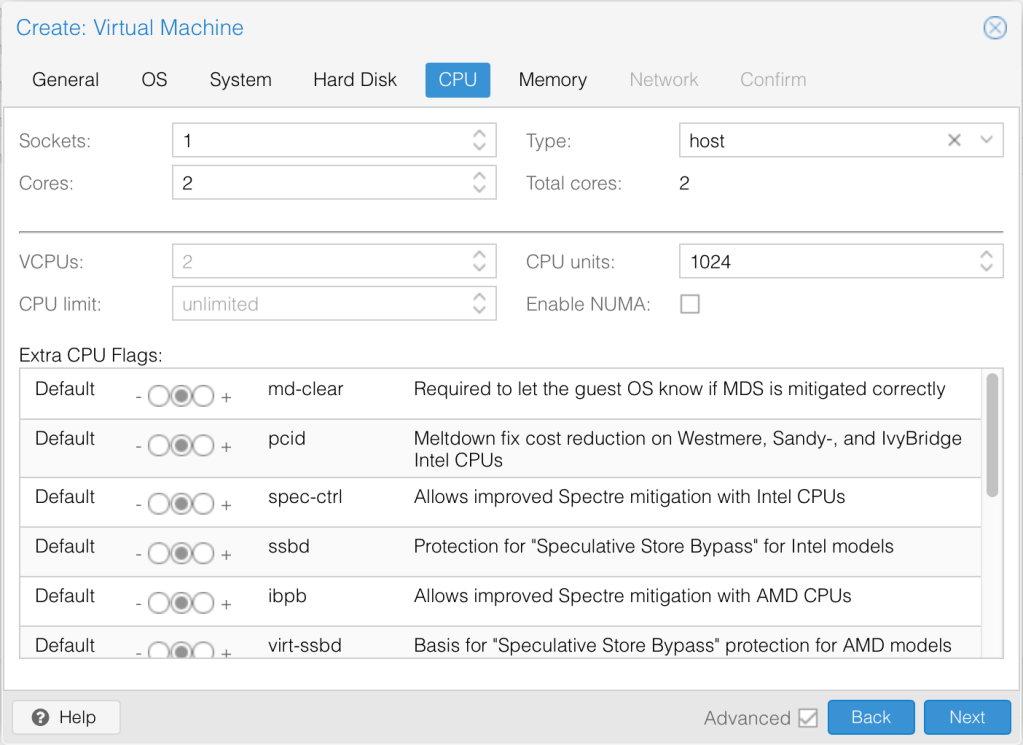
We increase the CPU cores to 2 and change the Type to host so as to match the CPU on the hypervisor hardware.
I’ll leave the machine with 2GB memory as that should be enough.

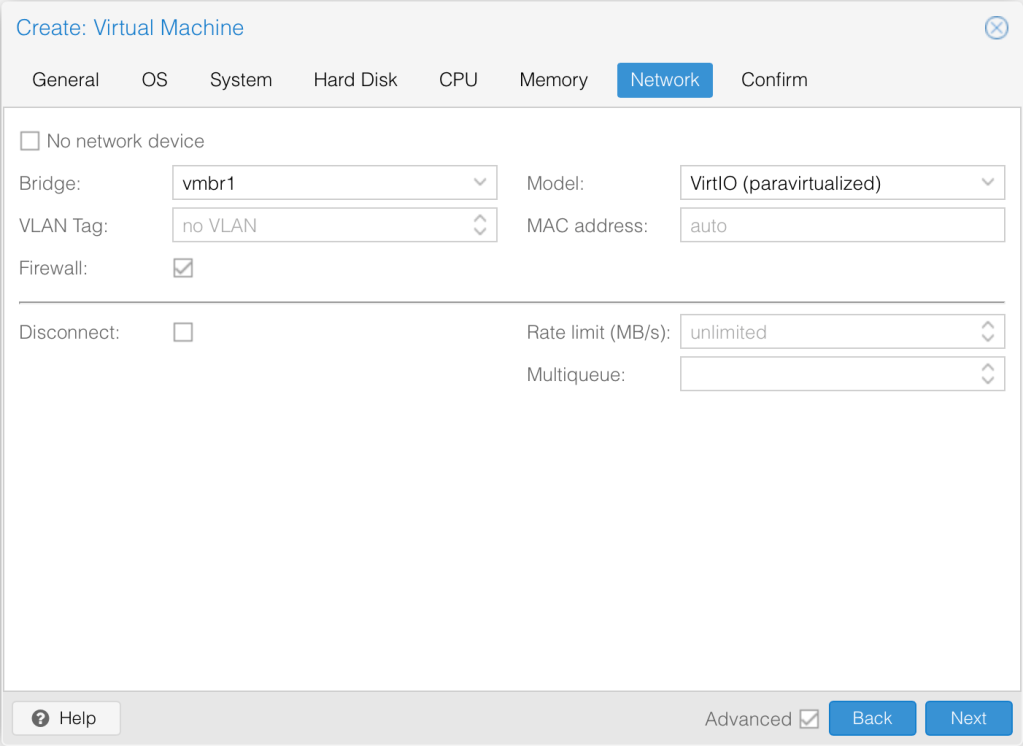
Now, add the first interface (LAN) as VirtIO (paravirtualized).
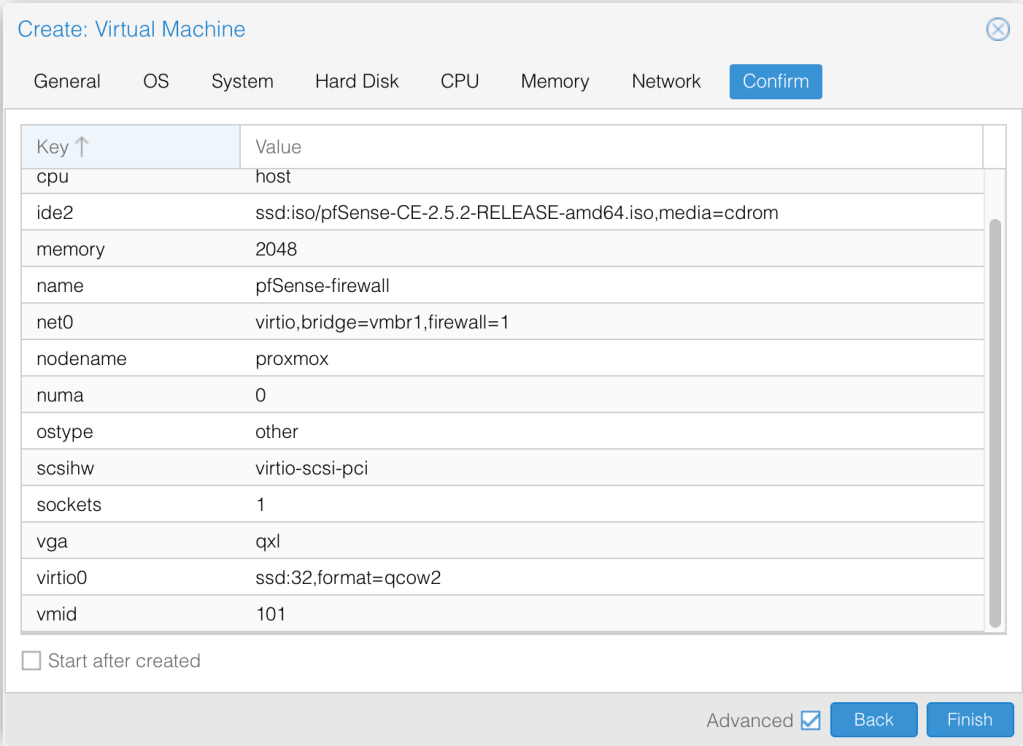
We are happy with the current settings, let’s review and click finish.
Once the VM is created, the status changes to OK.

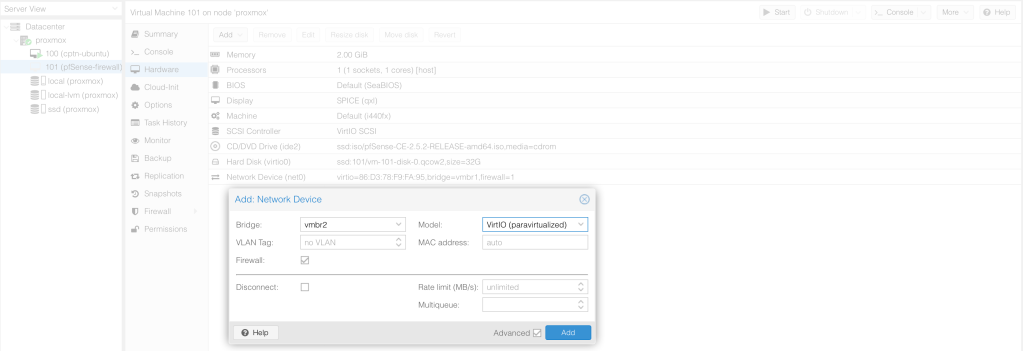
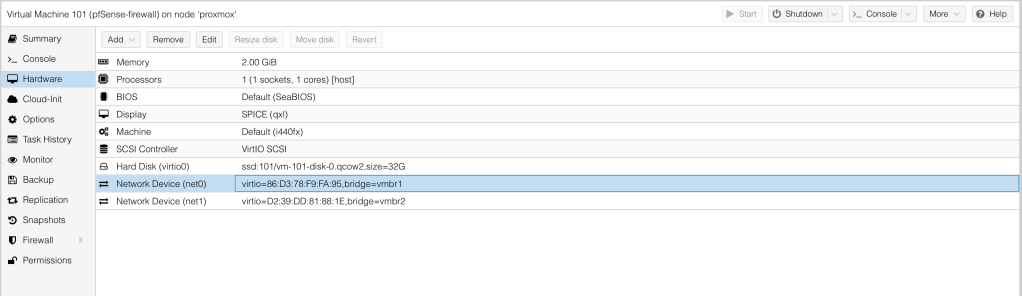
Before we boot the machine up, we need to add the second interface – WAN. Click on the pfSense firewall > Hardware > Add > Network Device.
We should now see two interfaces in our list, net0 and net1.

Since we are installing a firewall, the interfaces need not be firewall by Proxmox, so let’s uncheck that for the first and second bridge interface.
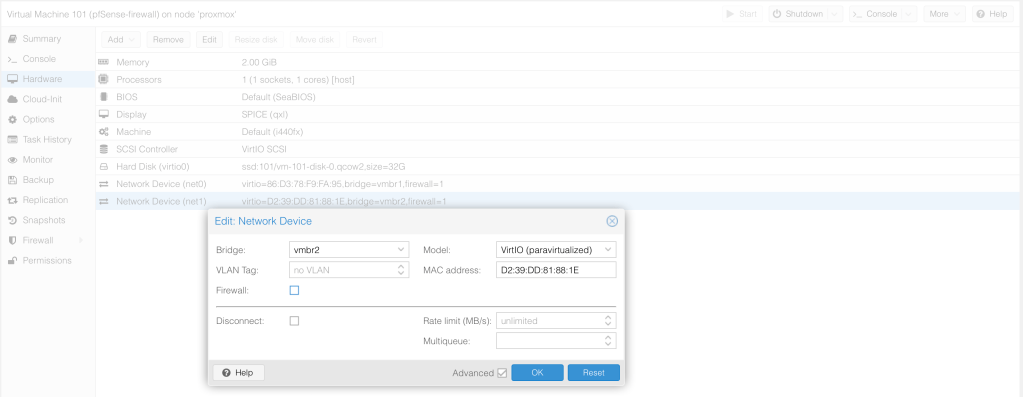
Both interfaces now do not have firewall=1
We need to ensure that the pfSense starts at boot, otherwise, the LAN devices will not have internet.
From the diagram in our previous post here, we see that pfSense has a total of 6 networks connected to it. At the moment, we only have 2 of those. Let’s add the rest. All we are doing is creating a Linux bridge and ensuring it is vlan aware.
All interfaces created are identical with the exception of the MAL interface which I leave as firewalled on Proxmox too.

We can now start the pfSense-firewall. This is can be done by simply clicking Start at the top right hand.
Configuring pfSense
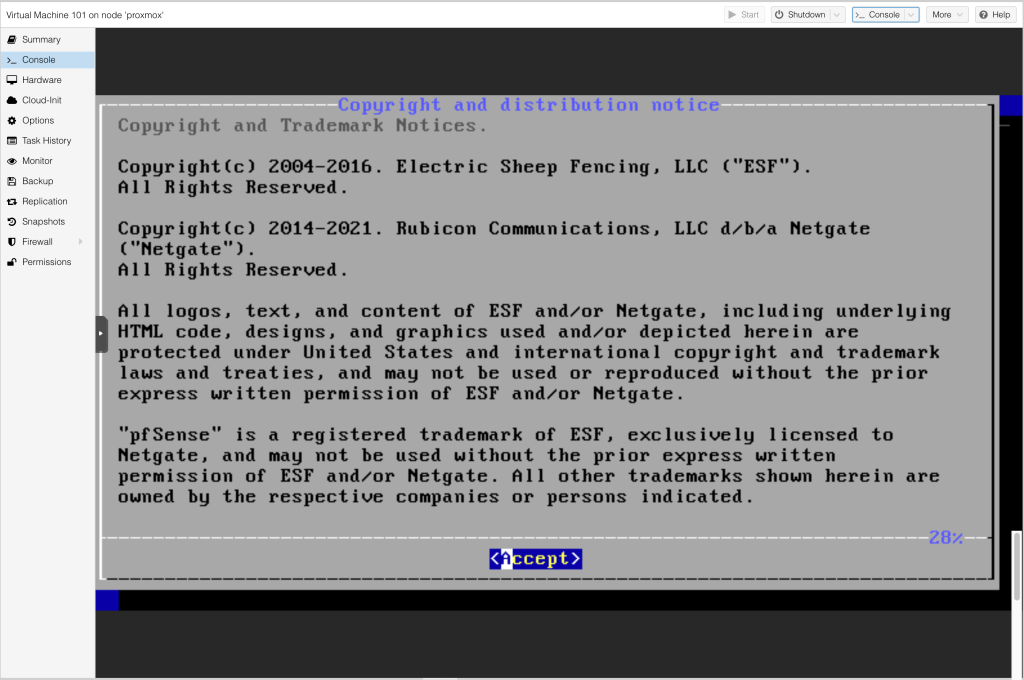
Let’s now drop to the Console to configure the firewall. The wizard is pretty straight forward. Click Accept to accept the copyright notice.
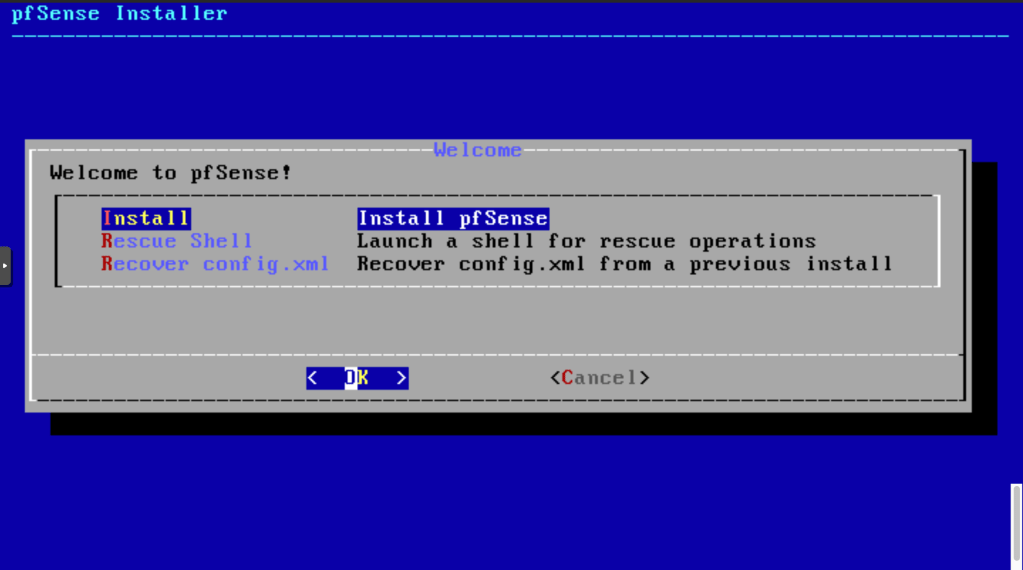
Next, Click Install pfSense.
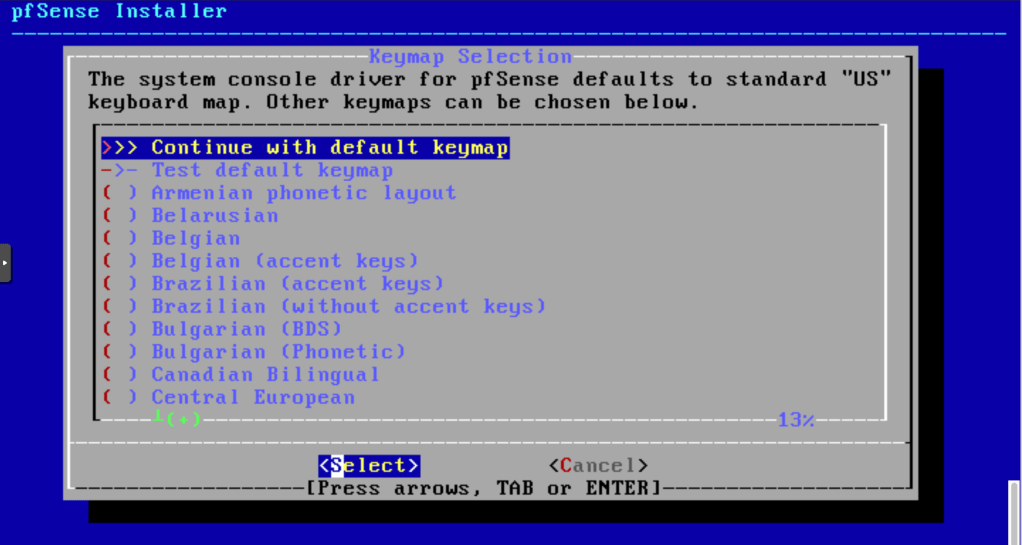
We will use the default US keymap.
Let’s accept the default pfSense Installer.
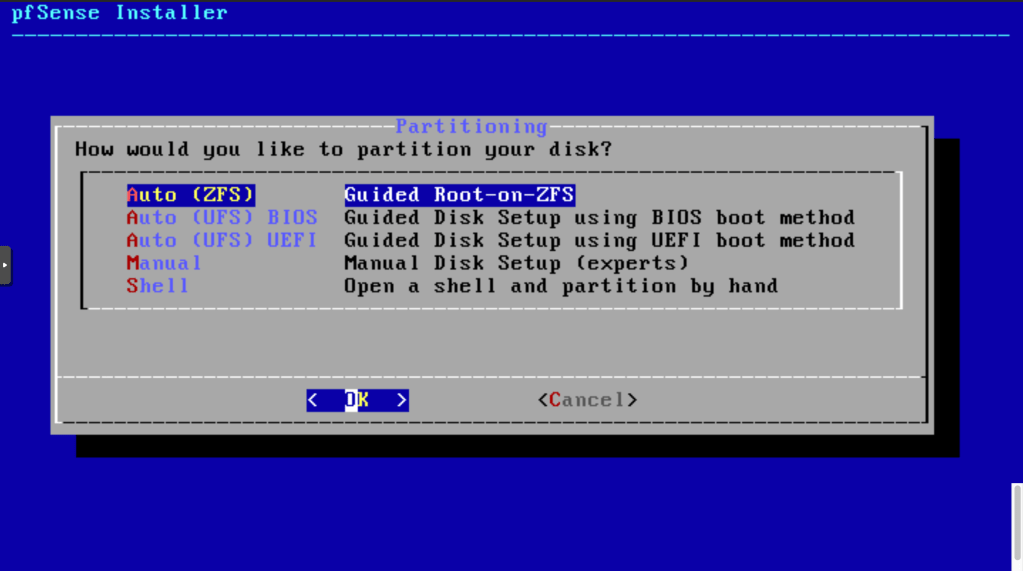
It will proceed with ZFS Installation.

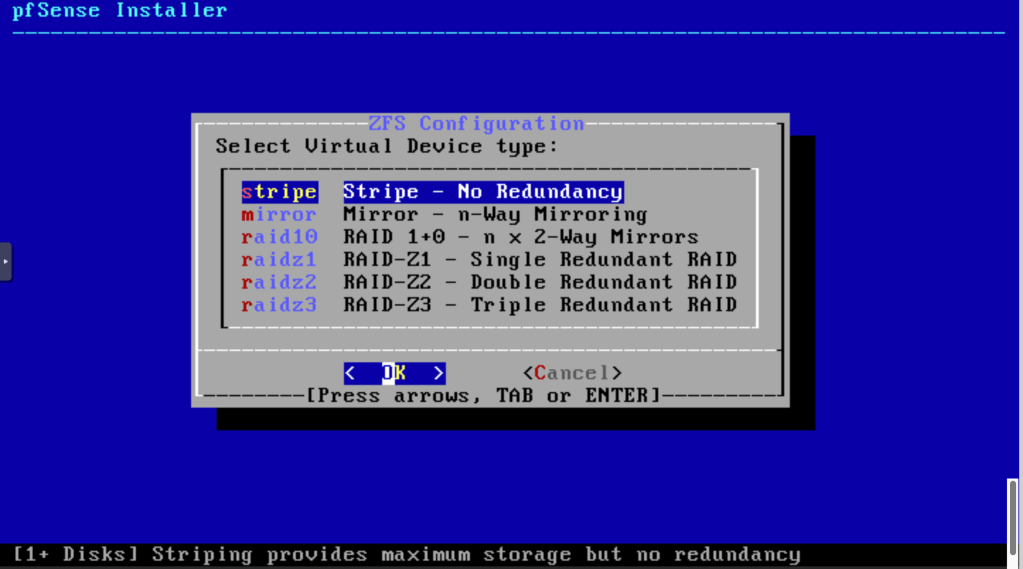
We have no redundancy at the moment and I’m OK with that, so let’s proceed.
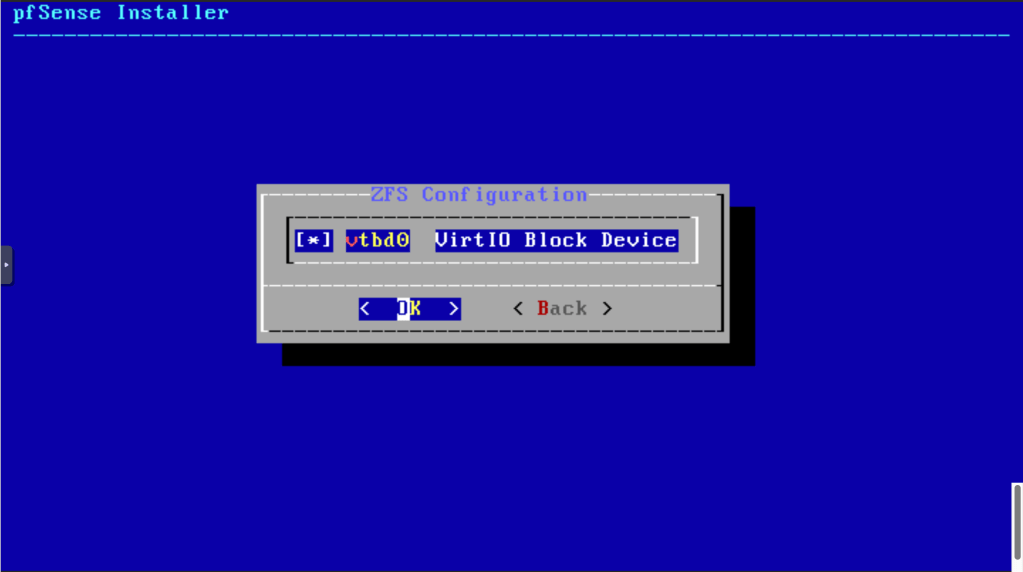
Use the space key to select the disk and click OK.
Finally confirmation of DOOM!
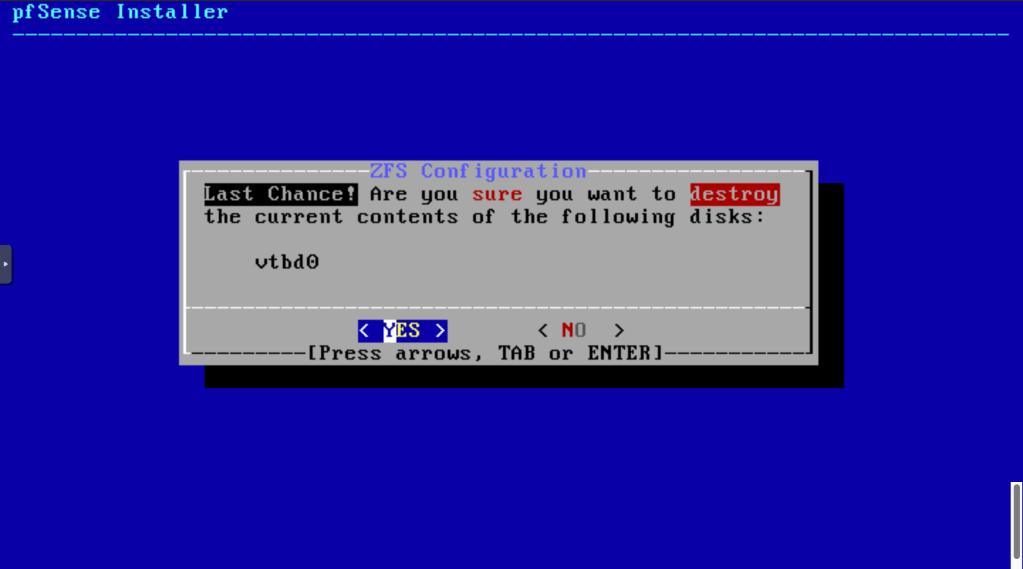
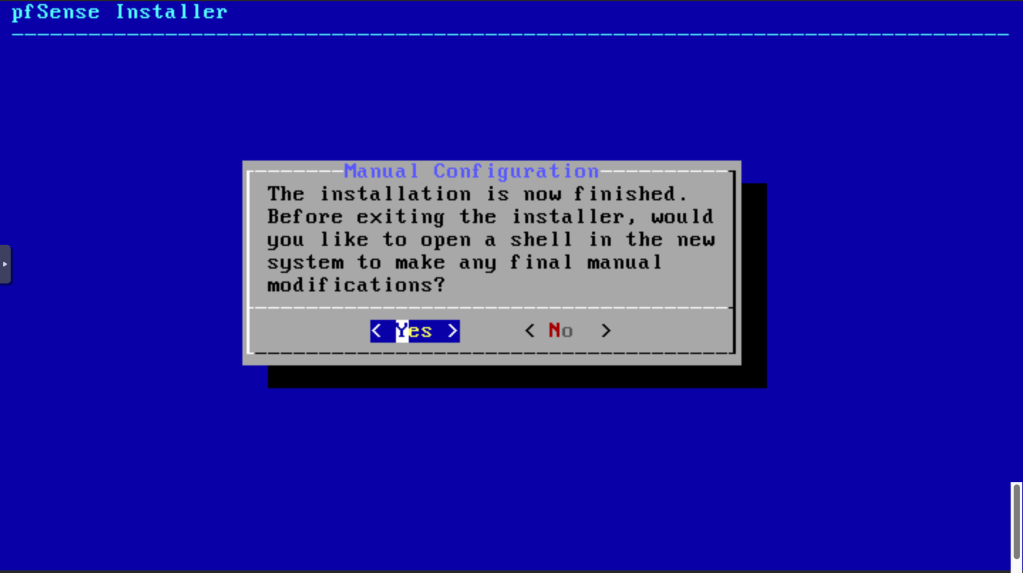
Let’s opt for NO. We can modify configuration later.
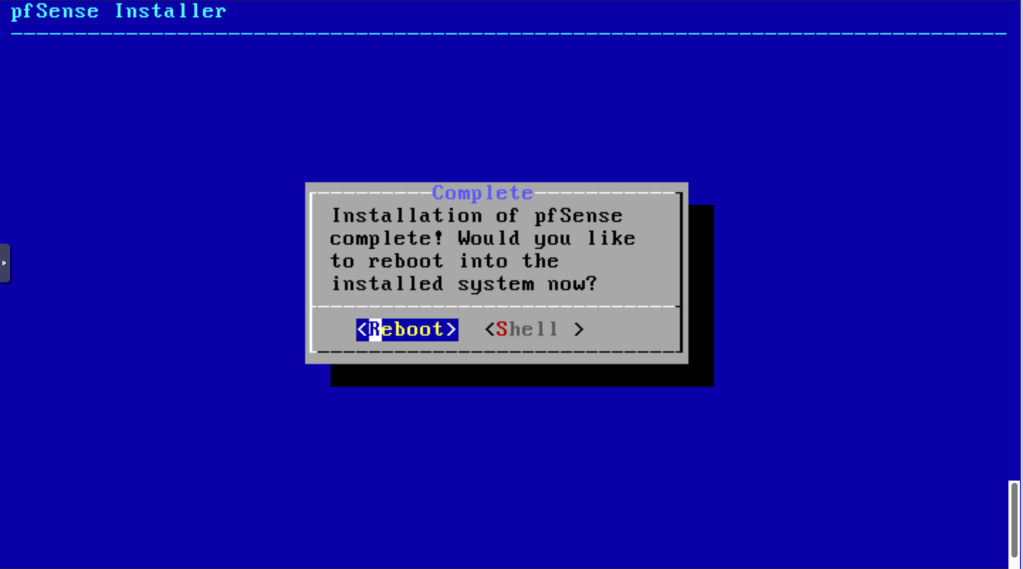
We are ready to reboot.
After rebooting, we are prompted for VLAN setup. Let’s skip that for now by entering n.
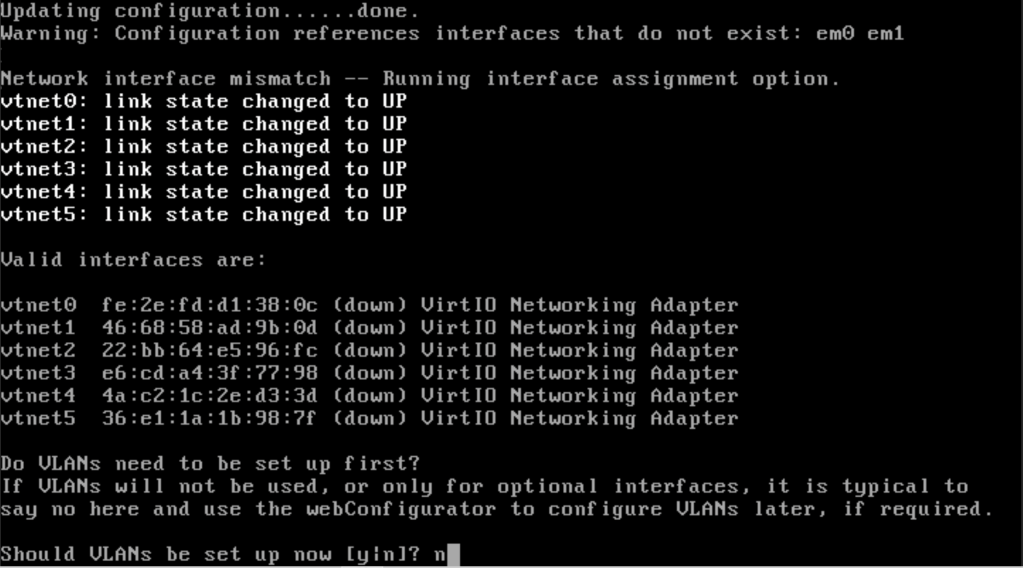
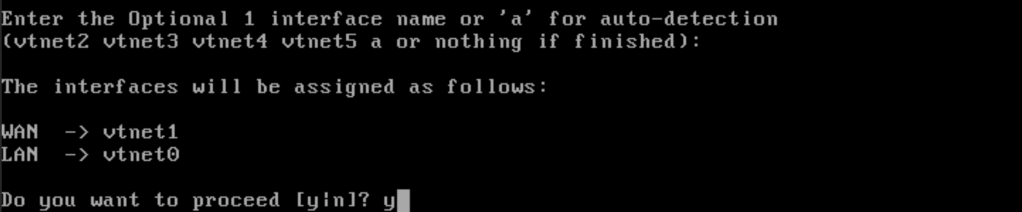
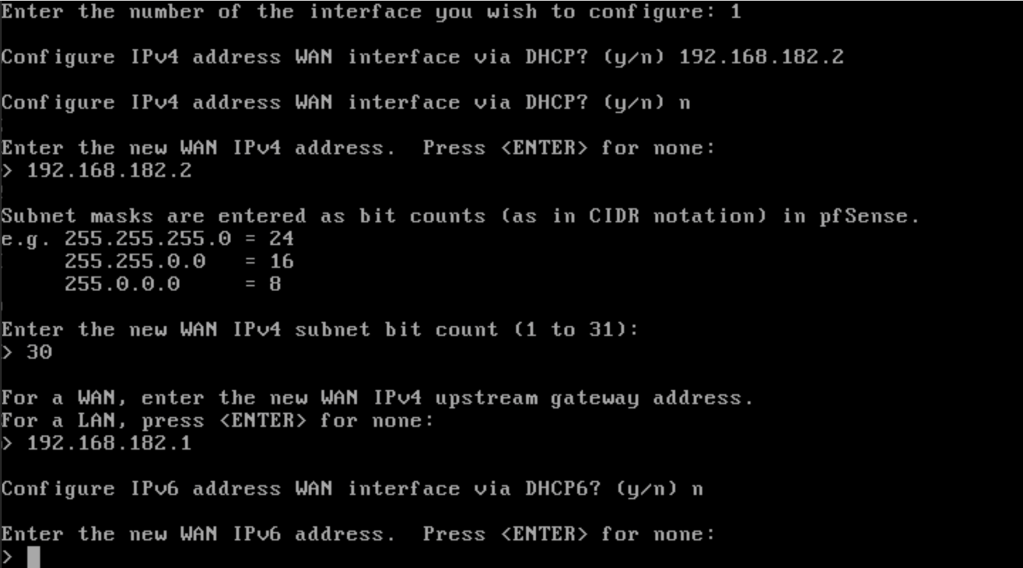
Specify vtnet1 for WAN.

Assign vtnet0 for LAN.

Let’s skip the other interfaces for now. Since we are happy with the assignment, enter y for yes.
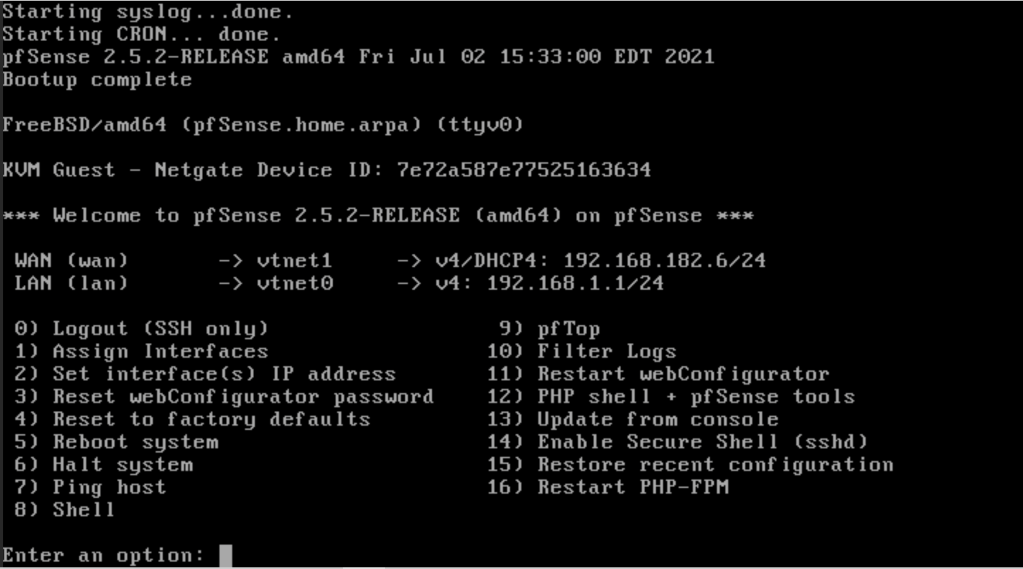
Setup is complete.
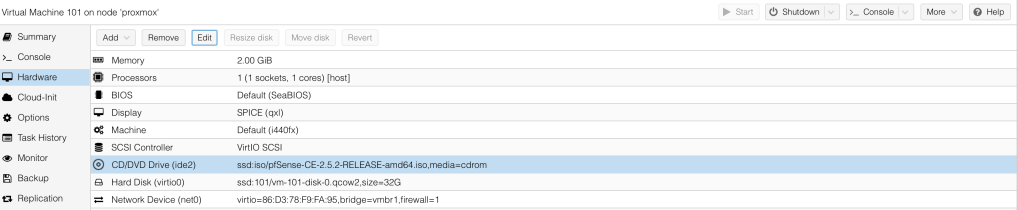
We can now remove the installation media from the VM by selecting the CD/DVD drive and clicking remove.
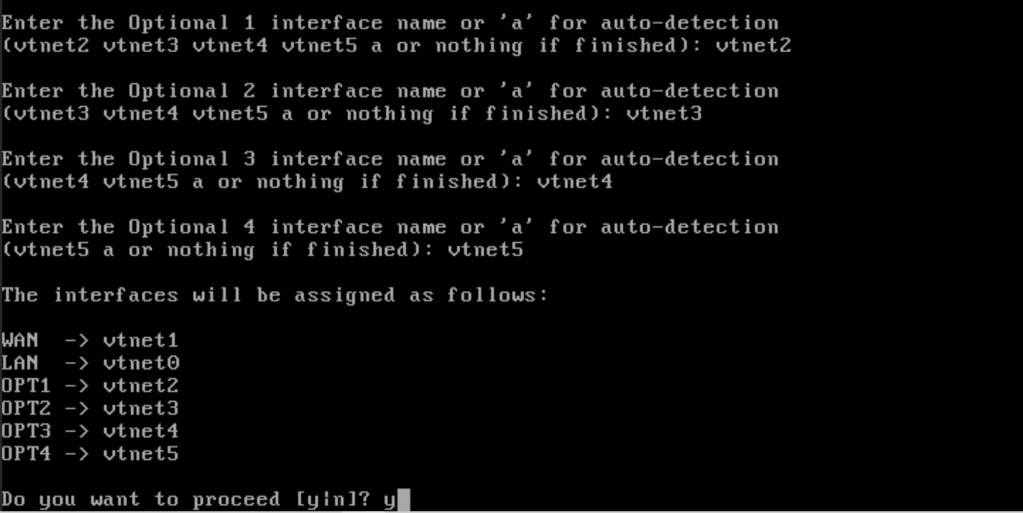
Let’s now add the other interfaces.

Once we are done assigning all the interface names, enter y to apply the changes.
Next, let’s assign static IP addresses to the interfaces. That way, the setup is predictable.
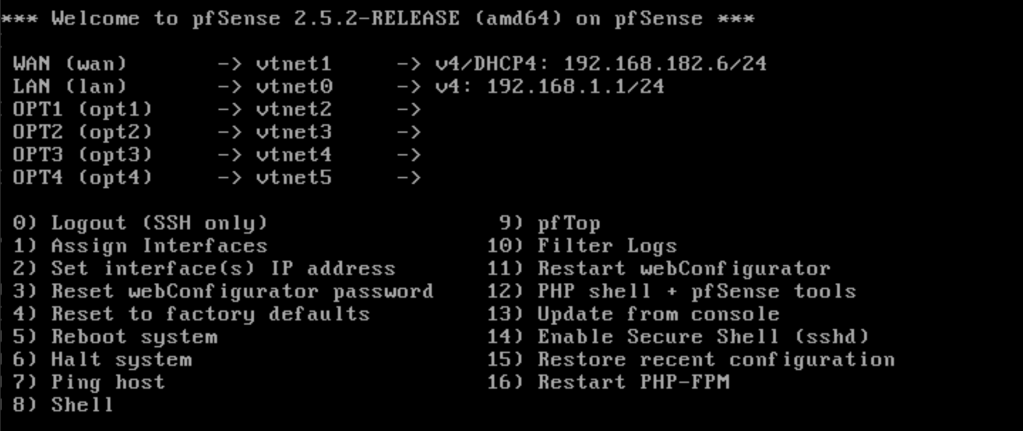
I will use the .2 address for all the subnets attached.
Next interface is the LAN.
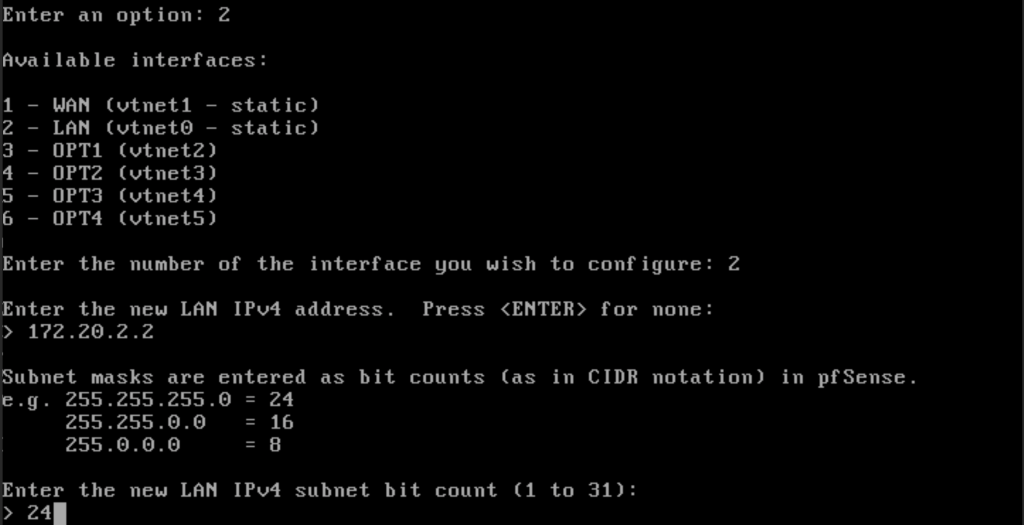
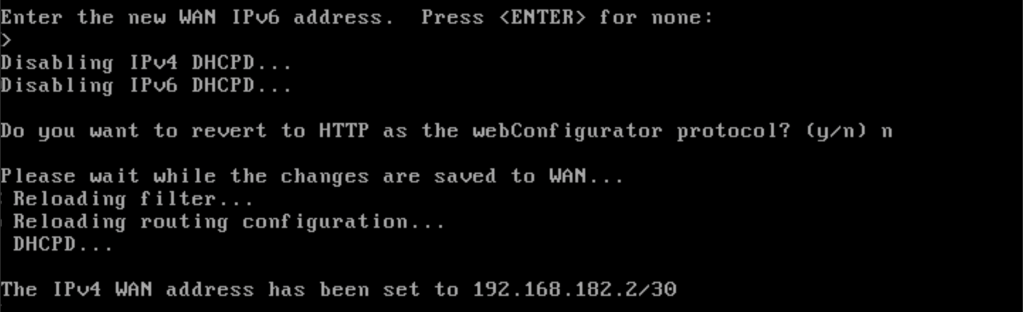
Once we are done setting up the LAN interface, we are provided with the URL to use to login to the pfSense device.

We now have both the WAN and the LAN setup. That’s enough for now. We will setup the other networks in due time.

Since we are using Proxmox VE VirtIO, one important thing we need to disable is Hardware Checksums otherwise the VM will not properly pass traffic. We will do that when we connect to the Firewall via LAN.
Deploying OpenWRT
Our next device is the open-source router OpenWRT. We can get one of the stable builds from the official website. In our case, we will use the generic-ext4-combined.img.gz file which we will download directly into proxmox.
# mkdir downloads
# cd downloads/
# wget https://downloads.openwrt.org/releases/21.02.0-rc4/targets/x86/64/openwrt-21.02.0-rc4-x86-64-generic-squashfs-combined.img.gz
Let’s now verify the checksum before using the image.
# shasum -a 256 openwrt-21.02.0-rc4-x86-64-generic-squashfs-combined.img.gz
dc25f11bb0e0a6b50450476e3ac64082117d19d63f6b0268eb3c534b7cb72191  openwrt-21.02.0-rc4-x86-64-generic-squashfs-combined.img.gz
The checksum matches so we are good to go. We now need to unzip the file. Once that is done, we are ready to begin.
# gunzip openwrt-21.02.0-rc4-x86-64-generic-squashfs-combined.img.gz
# ls
openwrt-21.02.0-rc4-x86-64-generic-squashfs-combined.img
Creating a VM for OpenWRT
We will create a VM the same way we did for pfSense. We need it to start at boot.
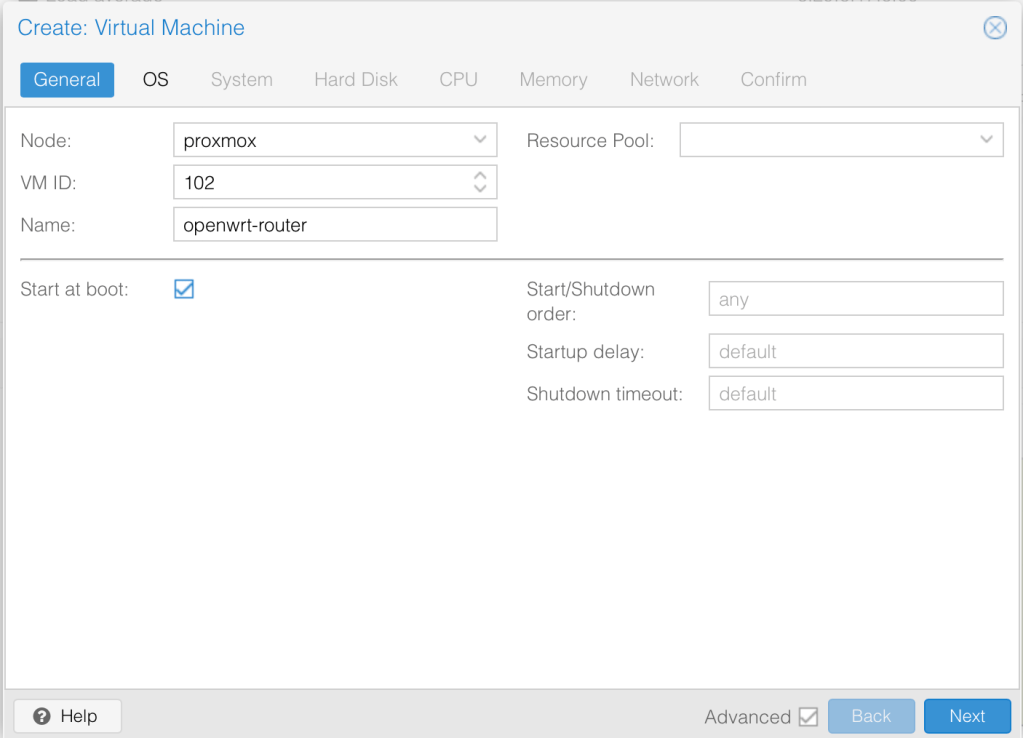
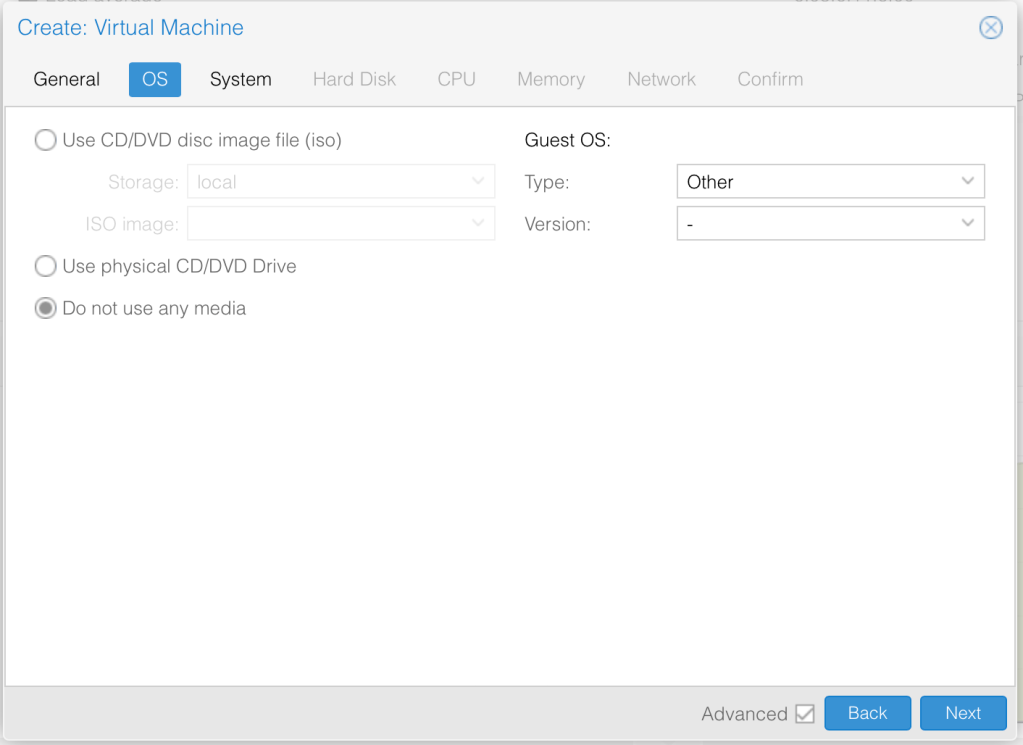
We won’t specify an Image yet.
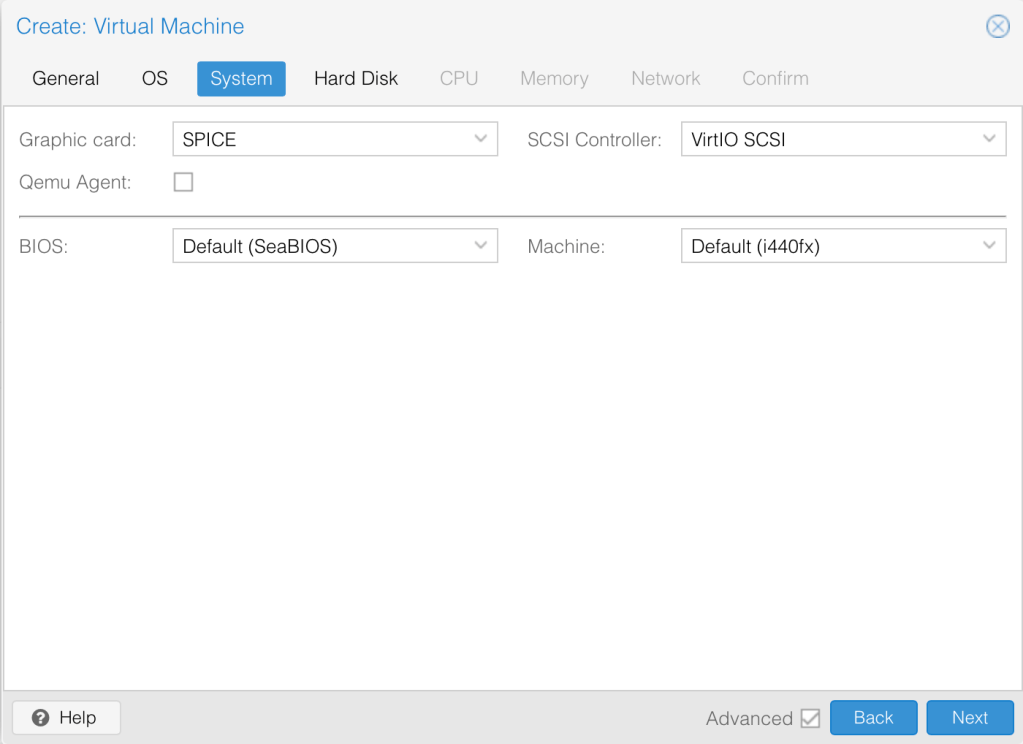
We will specify the SPICE graphics card and leave the rest as default.
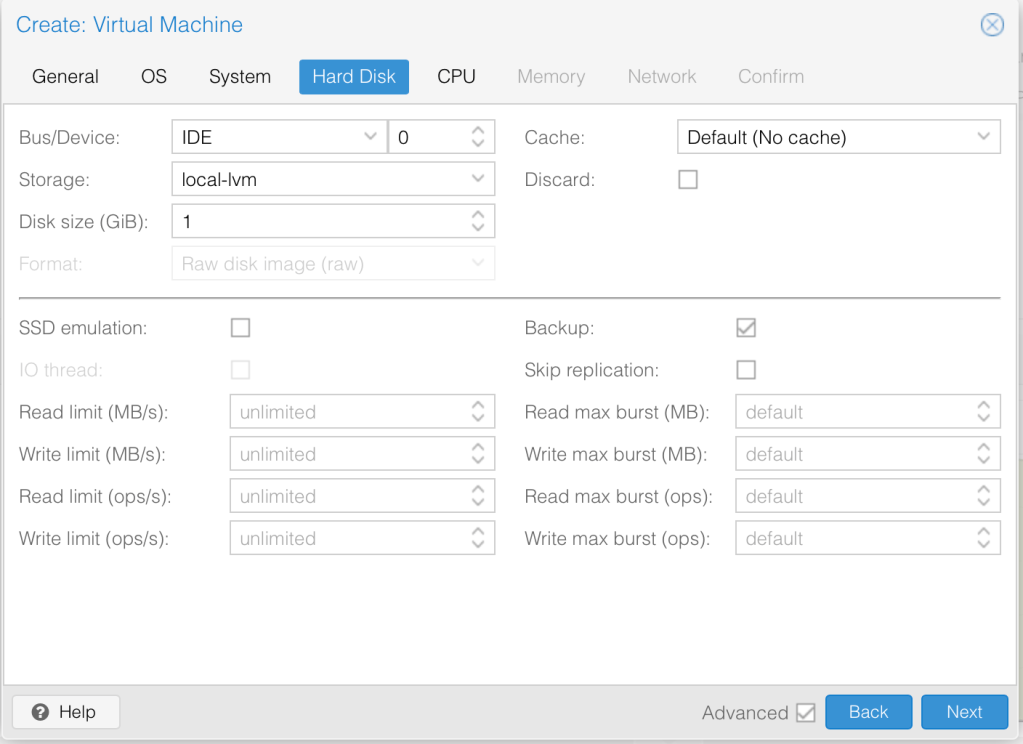
We will delete the disk so any random size will do.
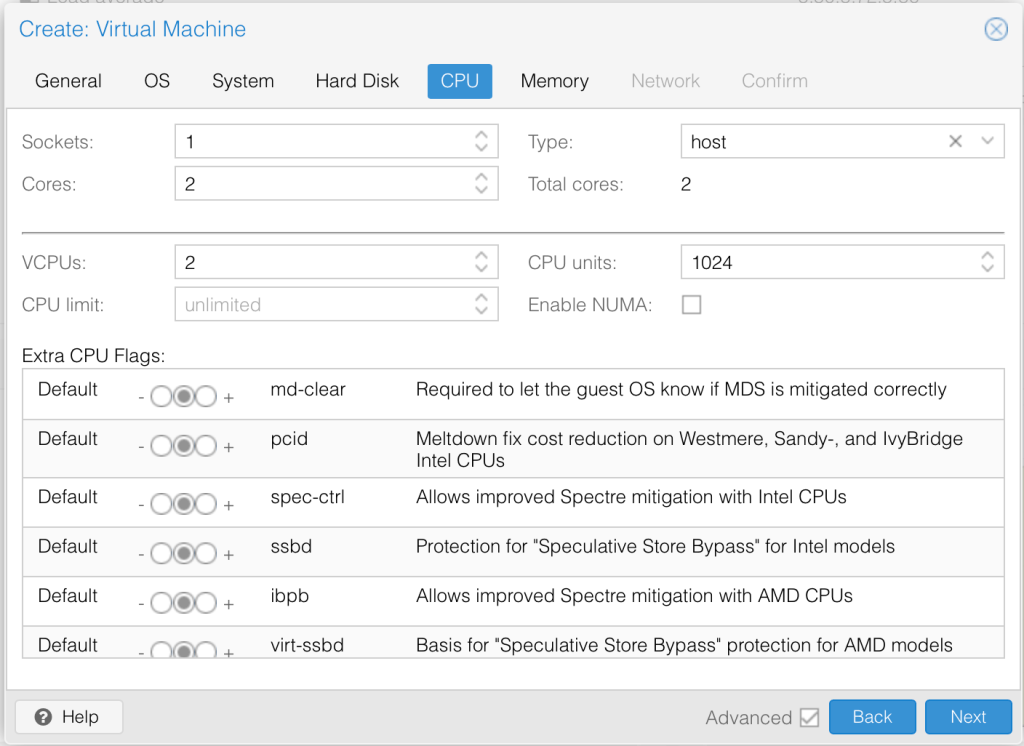
I’ll give it 2 cores and 2 vCPU’s and change the type to host for optimisation.
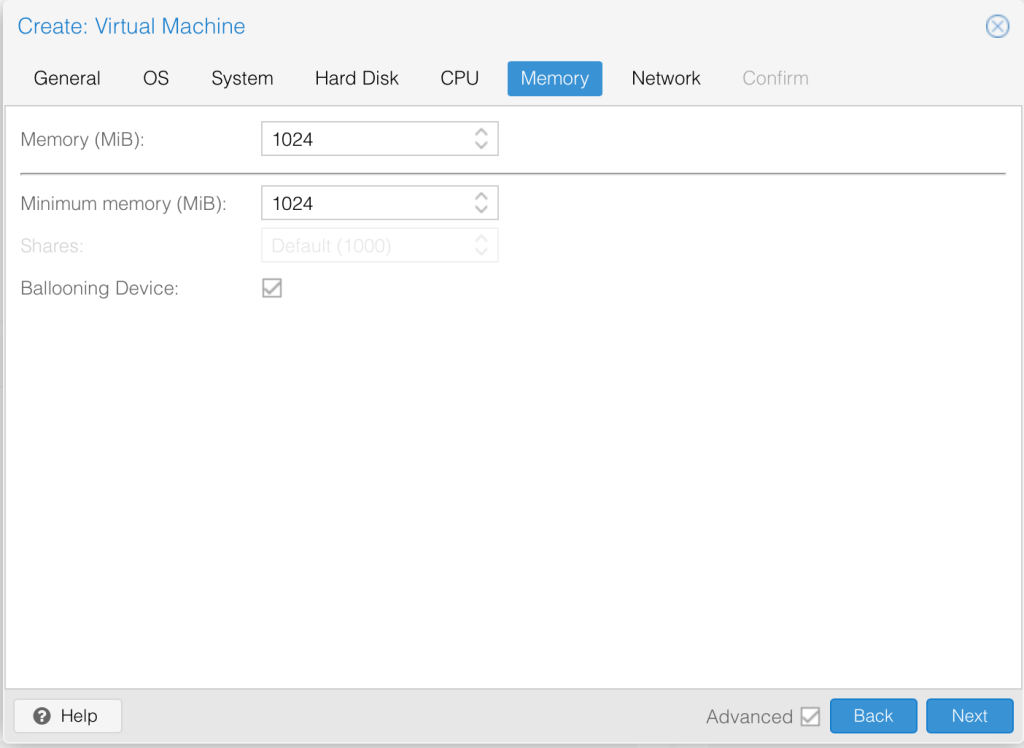
1GB memory should be enough.
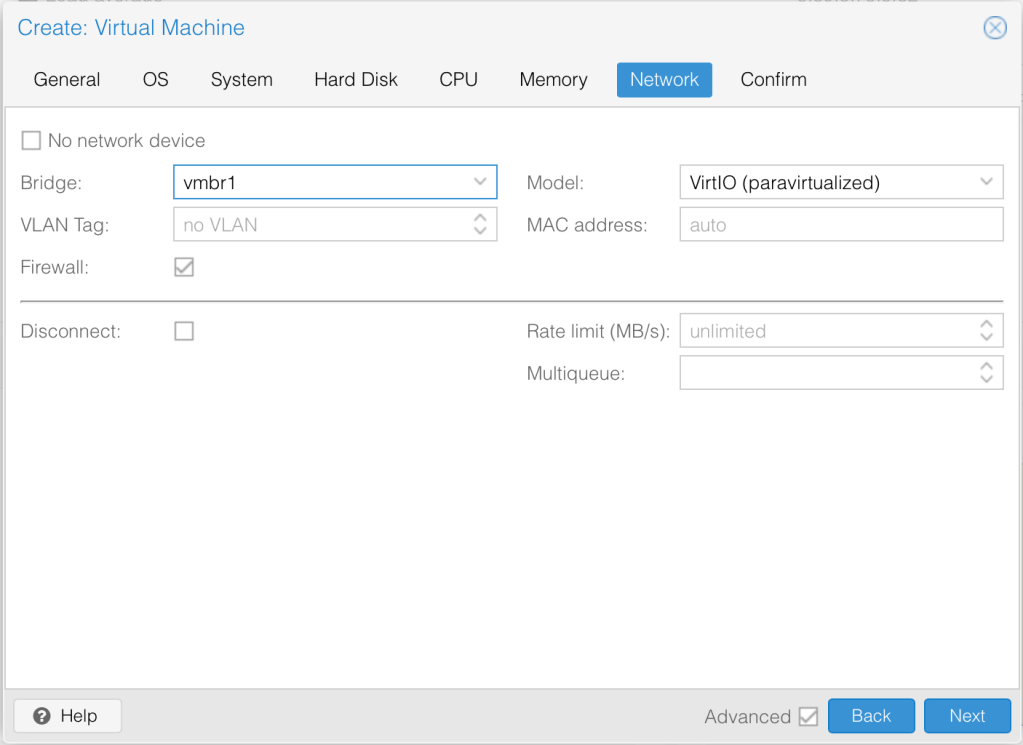
For network, we will keep it in the trusted LAN interface and change the model to VirtIO.
That’s all, we can create the VM now.
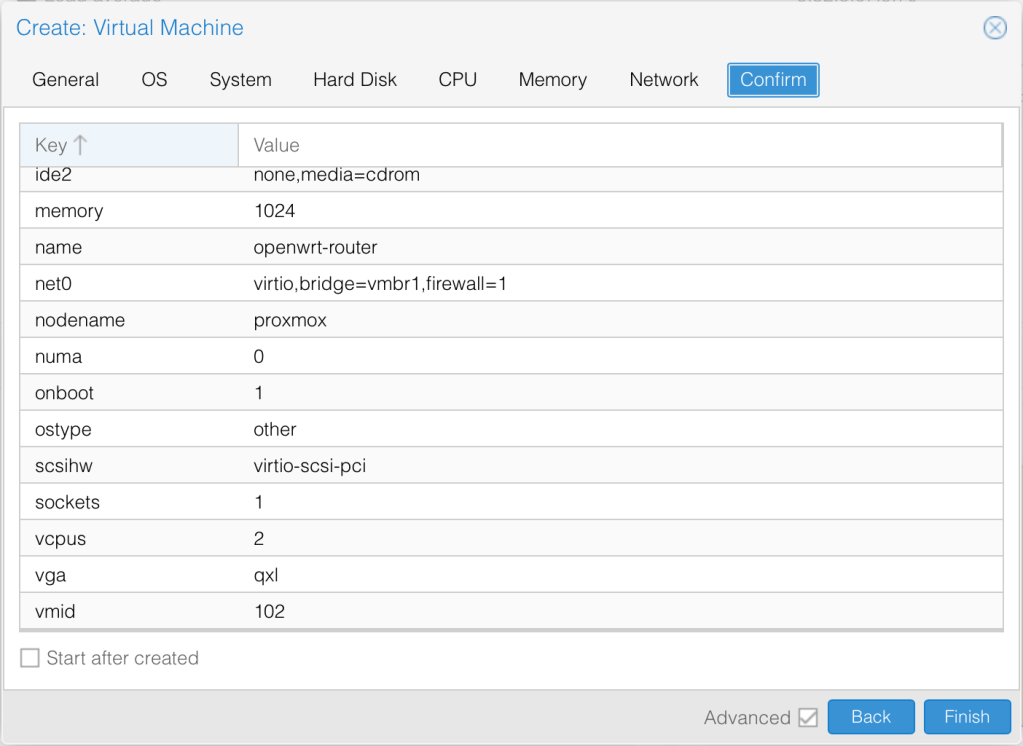
We see a confirmation that the VM has been successfully created.

Installing OpenWRT
We need to Detach the Harddisk then remove the unused disk.


Take note of the VM ID. In this case, it is 102. We need to switch to proxmox shell and run the import disk command to import the image.
# qm importdisk 102 openwrt-21.02.0-rc4-x86-64-generic-squashfs-combined.img ssd
importing disk 'openwrt-21.02.0-rc4-x86-64-generic-squashfs-combined.img' to VM 102 ...
//
transferred 120.5 MiB of 120.5 MiB (100.00%)
Successfully imported disk as 'unused0:ssd:102/vm-102-disk-0.raw'
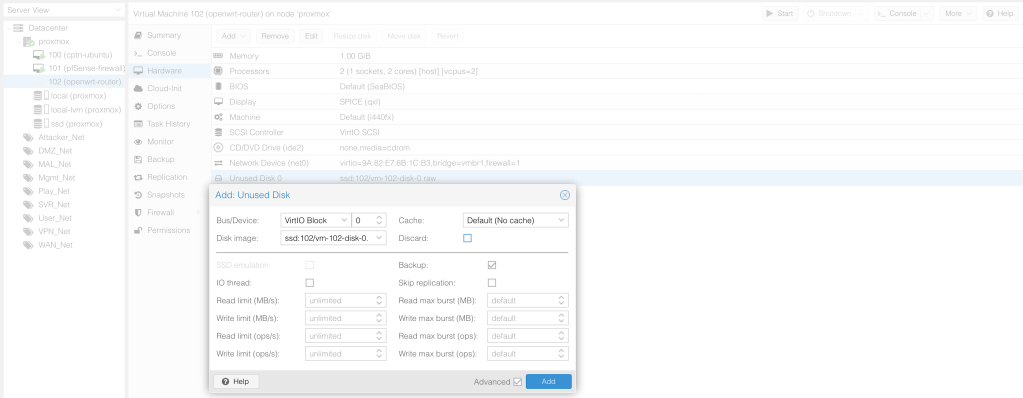
# mv openwrt-21.02.0-rc4-x86-64-generic-squashfs-combined.img openwrt.imgWe can now go back to the hard disk settings and specify the Harddisk to use.
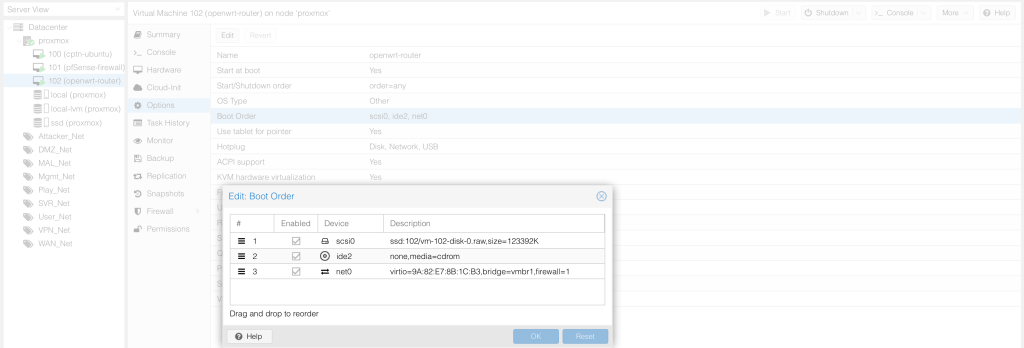
Ensure that the hard disk is enabled under boot order. Drag it to first place.
The router is now installed. Click enter to view the command prompt.
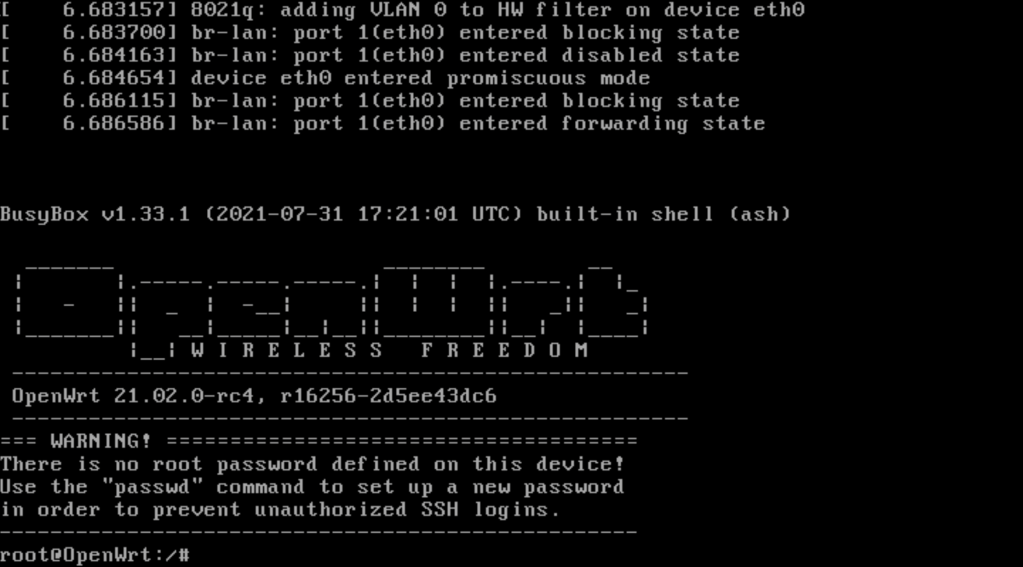
Let’s immediately change the login password so as to secure the router.

To verify the currently assigned address of the LAN interface we can use the uni show network.lan command.

We need to create the networks that connect to the router in proxmox. These are created as Linux Bridges. Don’t forget to apply the configuration.

These networks are based on the below diagram.
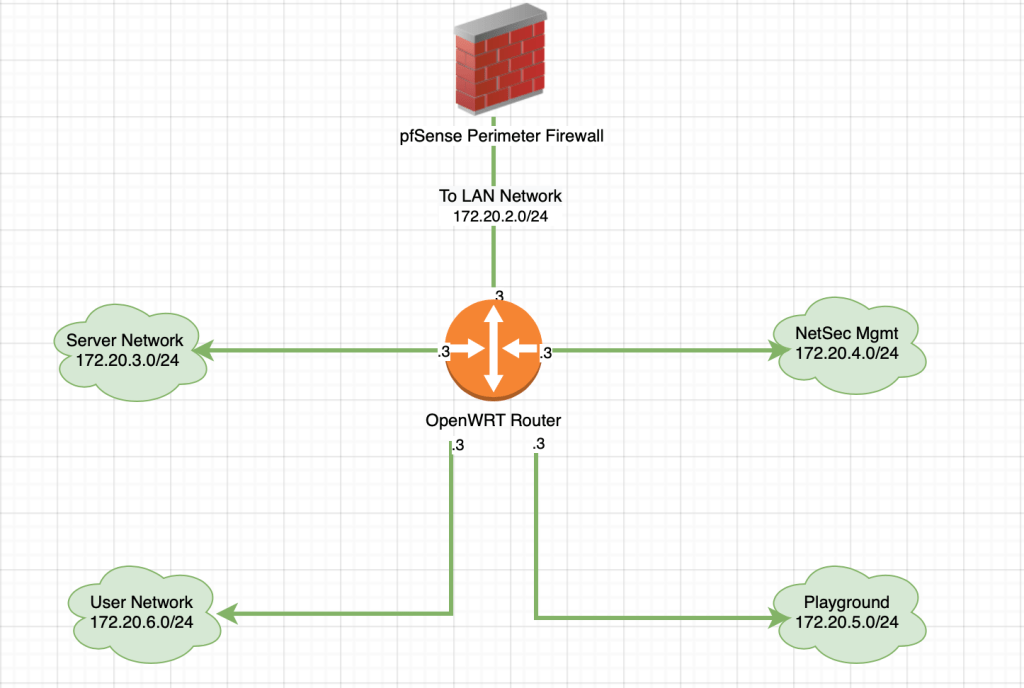
We now map those interfaces to OpenWRT. Don’t forget to change the model and disable firewall.
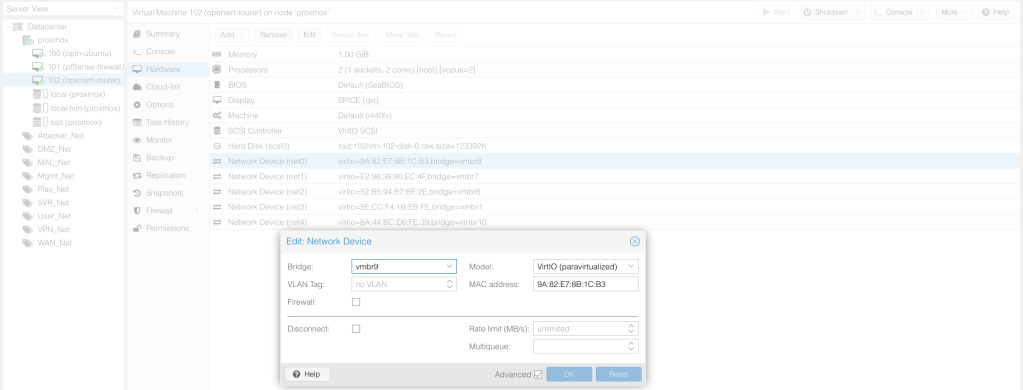
Let’s specify the IP address of the internal interface. This will be in NetSec Mgmt Network.

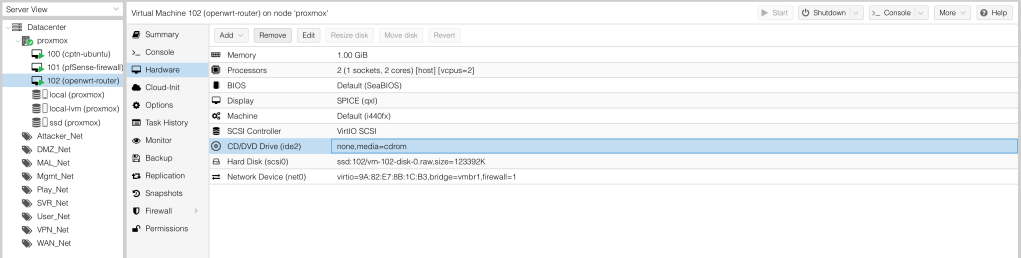
Finally, let’s also remove the CD since we do not need it then reboot the router to apply interface changes.
We are all set to access both the firewall and the router remotely. We will do that in our next blog post.
Till then, adios!
References
- Proxmox VE v7.0 Documentation Index
- How to setup your first virtual machine on a secondary hard disk
- Proxmox VE with Open vSwitch
- Import OVA
- Virtualizing with Proxmox® VE
- PfSense Installation Walkthrough
- ZFS Configuration
- Proxmox Beginner Tutorial: How to set up your first virtual machine on a secondary hard disk.
- How to: Configure NAT network for Virtual Machine (VM)/Guest OS on Proxmox VE 6.2 (PVE) easily (works for VMware ESXi too)
- HOW TO INSTALL OPENWRT IN PROXMOX VE AS A VM
- Building a Cybersecurity Homelab

It’s all virtual? SMH! My bad!
LikeLike
Yep. All virtual.
LikeLike
hi , i’m very happy and proud to read your post , it’s so helpful , i’m looking for a best arichesture for a homelab where i can learn and test cisco and cybersecurity technologie ,system and network technologie
LikeLike