Citrix NetScaler Editions
Feature licence required on all editions
- Standard Edition
- SME
- comprehensive L4-L7 traffic management
- Web application availability
- Enterprise Edition
- Advanced L4-L7 traffic management
- Web Application acceleration
- Increases Web application performance, availability and reduced costs
- Platinum Edition
- Reduces data center costs
- Accelerates application performance
- End to end visibility of application performance
- Advanced application security
Administration options:
- CLI
- VT100 terminal emulation, 9600 baud, 8 data bits, 1 stop bit, parity, and flow control set to NONE
- username: nsroot
- password: nsroot
- GUI
- Default NSIP (http://192.168.100.1)
- username: nsroot
- password: nsroot
Deployment types:
- NetScaler ADC – Optimization over the internet and private network
- Netscaler Gateway – Allows users to work from anywhere
- XenMobile MDM – Load balances data from the mobile devices to the XenMobile MDM Servers
- CloudBridge Connector – Sets up a secure tunnel beween 2 data centers or between a data center and cloud
Initial Configuration options
- First-time use wizard – Via web browser. Network configuration + Licencing information
- Assign NSIP for management of the Netscaler appliance + mask
- SNIP for servers to connect + mask
- Timezone
- Hostname (optional)
- DNS (Optional) – can then use hardware serial number (HSN) or license activation code (LAC) to allocate your licenses instead of uploading them to the appliance
- Upload licences
- LCD keypad – Located in the front panel of the appliance. Just network configuration. Licencing info is entered using a different interface
- Press <
- First Enter Subnet Mask
- Next NSIP
- Last Gateway
- Press enter
- Serial console – Via Console. Network configuration + Licencing information
- Login
- config ns
- system IP address
- create a subnet or mapped IP address
- configure advanced network settings
- change the time zone
set ns config -ipaddress -netmask add ns ip -type add route set system user -password save ns config reboot
- XML API – external Application Programming Interface (API) is used to configure the appliance. Simple Object Access Protocol (SOAP) over HTTP. Can be used to create custom client applications to configure and monitor the state of NetScaler
First Time High Availability Configuration
- One Unit (primary)actively accepts connections and manages servers, Other unit (secondary) monitors the first
- Units monitor each other by sending periodic heartbeats or health checks. Incase of failure, heartbeats are sent for a specific period of time, then the secondary takes over (failover)
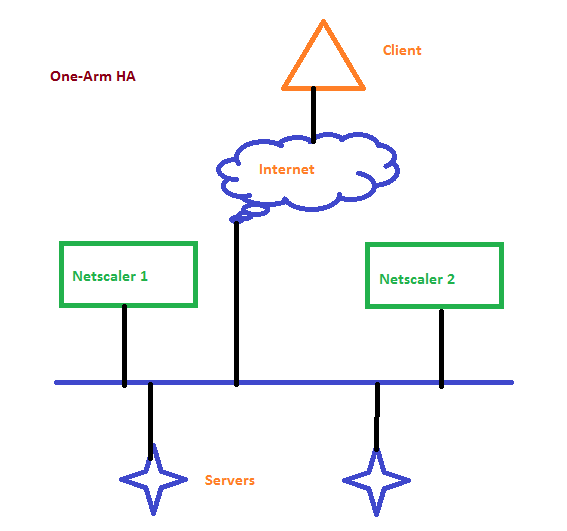
- Mode of operation
- One-arm – servers andnetscaler appliances are connected to the same switch
- Can be:
- Single subnet. Clients and servers on the same subnet.
- Multiple subnet. Client and servers reside on different subnets.
- Can be:
- One-arm – servers andnetscaler appliances are connected to the same switch
- Inline Mode (Two-arm) – netscaler are connected to 2 switches. servers are connected to the second switch. Traffic between client and serverspass through either netscaler appliances.
- One Interface is connected to the client network, the other to the server network
- Can be:
- Appliance in public subnet, servers in private (Multiple Subnet Mode)
- Both servers and appliance in public network (transparent mode). Used when the clients need to access the servers directly without an intervening virtual server. L2 Mode must be enabled for bridging the packets. NSIP and MIP are in the same public subnet

- Configuration procedure
- Configure 1 NS as primary, other as secondary
- Add a node on both NS ( logical representation of the peer NS). Used to exchange heartbeat messages
- From CLI
add HA node <id> <IPAddress>
show HA node <id>
- GUI
System> HA>Nodes>Add
- Disable HA on unused interfaces on both NS
- CLI
set interface -haMonitor OFF
show interface <id>
- GUI
System > Network > Interfaces – Open – HA Monitoring = OFF
Netscaler Packet forwarding Modes L2 Mode
- Netscaler behaves like a layer 2 device
- (Default – L2 disabled) – appliance drops packets that are not destined for one of its MAC address.
- Netscaler does not support STP
- If enabled: packets are not forwarded to any of the MAC addresses, because the packets can arrive on any interface of the appliance and each interface has its own MAC address
> enable ns mode l2 > disable ns mode l2 > show ns mode
L3 Mode
- Netscaler routes packets which are not destined for it (default mode)
> enable ns mode l3 > disable ns mode l3 > show ns mode
MAC-Based Forwarding Mode
- useful in VPN devices. Netscaler remembers the source MAC and MAC of the responding server.
> enable ns mode mbf
> disable ns mode mbf
> show ns mode
